Type: Individual ProjectUnit: Deployment and SecurityDue Date: Tue, 10/23/18Grading Type: NumericPoints Possible: 140Points Earned: Deliverable Length: Zipped project files, distribution package,
Running head: ANDROID APP DESIGN
Android App Design
Jacqueline Calloway
AIU
October 2, 2018
Specifically describe the design process for an Android phone application.
Every day new apps are being developed. The apps are meant to meet different purposes, yet their development and design process is analogous. When developing an app, it is imperative to consider the app design process as well as the mobile app design strategy. Apps are designed with respect to the evolving technology. In most cases, every app development process includes strategy, idea, design, deployment, development as well as the post-launch stage.
The first stage in the design process for an Android phone application is coming up with an idea. The problem that the app is meant to resolve is first identified. Additionally, the features of the app are also formulated in the idea stage. The second stage is the identity. It is in the identity stage that targets the users of the app, the devices, and mobile platforms and the income model are identified. The third stage is nor designing the app. The app designer should concentrate on the platform design regulations, the UI design, and multi-touch signal for devices that are touch enabled. The fourth stage is identifying the approach of developing the application. The approach can either be Web, Native, or Hybrid. Web apps are usually easy and cheap to design, and they can function on diverse platforms. Native apps provide the best user experience, though they need a lot of skill and time to develop. A hybrid approach is the latest app design methodology. The hybrid approach combines the on-the-fly net coding with the prebuilt indigenous containers to provide the best results (Tsyrulnyk, 2018).
The fifth stage is developing the prototype. Basically, the prototype involves the conversion of the idea into the app using some primary functionality. It is the prototype that enables the app designer to sell the idea to the possible buyers. The sixth stage is the integration of a suitable analytic device. There are various mobile analytic tools that enhance this process. They include Flurry, Preemptive, Mixpanel, Localytics, and Google Analytics (Tsyrulnyk, 2018). The next step is identifying the beta-testers. It is through beta testing that the app designer obtains the feedback regarding the app design and integrates the ones that are relevant. The identification stage of the beta testers mostly involves goal recognition, elimination of bugs, and defining the target buyers.
The eighth stage of the design process for an Android phone application is releasing the app. The app should be released by ensuring that the right components are released, and the environment is guarded. The next stage is capturing the metrics on the use of the app. The final stage is making app upgrades. The app should be upgraded with the new features and improvements to aid its usability and relevance (Tsyrulnyk, 2018).
Include a discussion of the role of Extensible Markup Language (XML) in the design process and how XML is used in the Android application files.
The Extensible Markup Language (XML) plays a paramount role in the design process for an Android phone application. It is the XML that ensures that the information in any designed app is easily processed and comprehended. Secondly, XML ensures that an app has as many tags as possible. XML enables the app designed to interpret the importance of the content, intelligent mining of data, agents, as well as establishing fresh options for tremendously competent search engines, among others. XML ensures that the meaning of the content is easily elaborated. Additionally, XML aids in the process of data aggregation and assessment, as the structure of XML document has been designed in a way that the assessment and aggregation of documents are enhanced. XML ensures that the feel and look of a document are enhanced without changing its content (H.Vaidya and Naik, 2017).
Discuss the best practices and also the problems and solutions regarding design, layout, performance, compatibility, and security.
Advancements in technology have led to reliance on mobile phones for the effective satisfaction of daily human wants. In designing the Android mobile apps, it is imperative for the designer to effectively navigate through the existing challenges in design, performance, layout, security, and compatibility. The app designer should ensure that the physical restraints are observed during the app design process. The compatibility, shapes, designs, and performance of all the phones should align with the fixtures of the app for its effectiveness. The designer should ensure that the app is compatible and response in every phone despite its screen size (FireArt, 2018). The designed app should effectively address all the needs of the target customers without flaws. The minimalistic approach of app design should be employed to ensure the app created generates pleasing user experiences. It is crucial for the app design to design an app that has desired display among its users. The app designer should, therefore, seek the opinion of the target customers to know the color they prefer the app to have. The app gestures ought to be integrated into the app for its relevance and usability. The app designer should consult the target customers on which gestures should be present in the app. The hand-to-screen interfaces should be considered in the app design. The designer should ensure that the physical comfort of the user is promoted in the app design. The working area provided by the app too must be appealing.
Explain the difference between a light and a heavy layout and how they both relate to overall performance.
Layouts are the major part of Android apps and they directly determine the user experience. Poor implementation of the layout leads to slow UIs due to memory hungry effect. A light layout is designed to ensure that the app has no much complexity in its hierarchy structure. A heavy layout enables the app to handle complex web pages which fasten the rate of data access. It is worth noting that fewer data mostly translate to less functionality and usefulness of the app. An app with the light layout is faster and more usable, though it is challenging when it comes to handling complex data as opposed to heavy layout apps (Menzies, 2015).
Design of the Application
Our Application is known as Healthy Life. Healthy Life App is an application that will be able to offer customers recipes that are used in bakery and grocery products used in Healthy Life bakery and grocery store.
The application will be designed using Android Studio and also tested using an emulator known as Genymotion.
Android Studio
According to Android.com, Android Studio is the official Integrated Development Environment (IDE) for Android app development, based on IntelliJ IDEA. Android.com further adds that, on top of IntelliJ’s powerful code editor and developer tools, Android Studio offers even more features that enhance your productivity when building Android apps, such as: flexible gradle-based build system, a fast and feature-rich emulator etc.
Genymotion
According to Saraswat J (2017) Genymotion is one of the most stable Android virtual machines that help in testing and debugging the android apps. Saraswat J (2017) also adds that Genymotion is third-party programs that come with Android virtalization to test the Android mobile apps.
Advantages of Genymotion
Speed
Virtual machines are slower when it comes to testing the apps compared to the actual device. Saraswat J (2017) says that Genymotion comes with increased speed for testing apps as it is incorporated into the x86.
Accessibility
Saraswat J (2017) says that Genymotion is preferred by the most of the mobile app tester due to its simple and accessible user interface.
The following are the screenshots of Healthy Life app
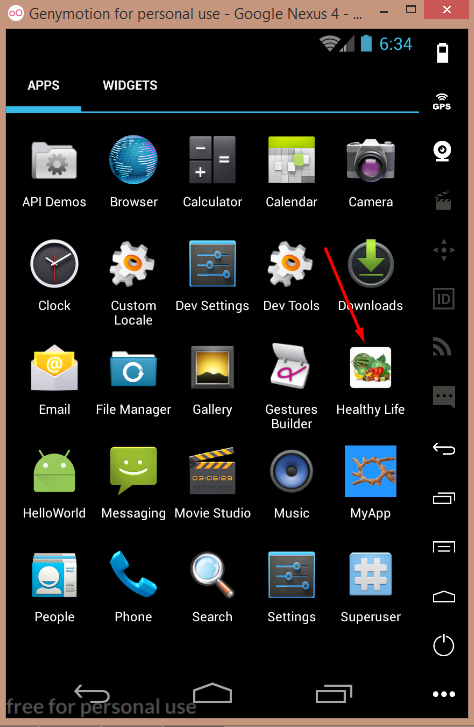
You can see from the screenshot our app is indicated with a red arrow.

The above screenshot shows the splash screen which displays an advert of what our organization is all about.

The above screenshot is shown when the app has finished loading and this is the first page you see.
Development of the splash screen
In order for me to create the splash screen, I had to create an activity in a Java class. The following is the Java class known as Splashscreen.java
package com.apress.gerber.healthylife;
import android.app.Activity;
import android.content.Intent;
import android.os.Bundle;
import android.os.Handler;
/**
* Created by Jackie
*/
public class Splashscreen extends Activity{
Handler handler;
@Override
protected void onCreate(Bundle savedInstanceState){
super.onCreate(savedInstanceState);
setContentView(R.layout.splashfile);
handler = new Handler();
handler.postDelayed(new Runnable(){
@Override
public void run(){
Intent intent = new Intent(Splashscreen.this,MainActivity.class);
startActivity(intent);
finish();
}
}, 3000);
}
}
After creating the class, you have to include it in the AndroidManifest.xml file. The following is the AndroidManifest.xml file with our class Splashscreen included
<?xml version="1.0" encoding="utf-8"?>
<manifest xmlns:android="http://schemas.android.com/apk/res/android"
package="com.apress.gerber.healthylife">
<application
android:allowBackup="true"
android:icon="@mipmap/ic_launcher"
android:label="@string/app_name"
android:supportsRtl="true"
android:theme="@style/AppTheme">
<activity android:name=".Splashscreen">
<intent-filter>
<action android:name="android.intent.action.MAIN" />
<category android:name="android.intent.category.LAUNCHER" />
</intent-filter>
</activity>
<activity android:name=".MainActivity"/>
</application>
</manifest>
You also need to have an .xml file that will cater for the layout of the splash screen. The following is the xml file known as splashfile.xml that caters for the layout of the splash screen.
<?xml version="1.0" encoding="utf-8"?>
<LinearLayout xmlns:android="http://schemas.android.com/apk/res/android"
android:layout_width="fill_parent"
android:layout_height="fill_parent"
android:layout_gravity="center"
android:background="#3366cc"
android:gravity="center"
android:orientation="vertical">
<ImageView
android:id="@+id/logo_id"
android:layout_width="250dp"
android:layout_height="250dp"
android:layout_centerInParent="true"
android:src="@drawable/splash"/>
<TextView
android:layout_width="wrap_content"
android:layout_height="wrap_content"
android:layout_below="@id/logo_id"
android:layout_centerHorizontal="true"
android:text="Healthy Life"
android:textSize="30dp"
android:textColor="#ffffff"/>
</LinearLayout>
In order to come up with the launcher icon, you write click on your application. From the menu that appears, go to New and from there go to Image Asset. From Image Asset, you can upload the image that you want to use as the app launcher icon. The following screenshot shows this step.

All the images used in the Healthy Life application are free from Pixabay.com.
Incorporating database in the Android application
According to Meier R (2012) Android provides structured data persistence through a combination of SQLite databases and Content Providers. Meier R (2012) says that SQLite database can be used to store application data using a managed, structured approach. Meier R (2012) adds that android offers a full SQLite relational database library. Meier R(2012) says that Android databases are stored in the /data/data/<package_name>/databases folder on your device or emulator.
Content Providers
Meier R (2012) says that Content Providers provide an interface for publishing and consuming data, based around a simple URI addressing model using the content://schema.
SQLiteOpenHelper
According to Meier R (2012) SQLiteOpenHelper is an abstract class used to implement the best practice pattern for creating, opening, and upgrading databases. Meier R (2012) adds that by implementing a SQLite Open Helper, you hide the logic used to decide if a database needs to be created or upgraded before it’s opened, as well as ensure that each operation is completed efficiently.
In order for us to create the database, I first created an activity (DatabaseActivity) which will have the interface that I will use with my database. The following screenshots shows my interface with one screenshot having the category opened.
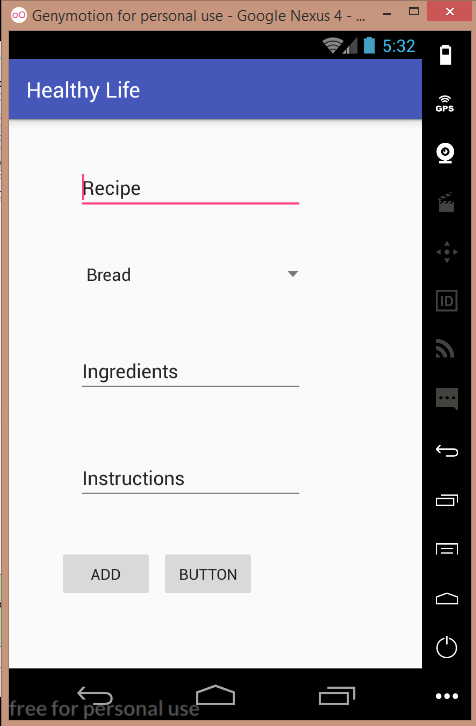

The following is the xml file of our Activity
<?xml version="1.0" encoding="utf-8"?>
<RelativeLayout xmlns:android="http://schemas.android.com/apk/res/android"
xmlns:tools="http://schemas.android.com/tools"
android:id="@+id/activity_database"
android:layout_width="match_parent"
android:layout_height="match_parent"
android:paddingBottom="@dimen/activity_vertical_margin"
android:paddingLeft="@dimen/activity_horizontal_margin"
android:paddingRight="@dimen/activity_horizontal_margin"
android:paddingTop="@dimen/activity_vertical_margin"
tools:context="com.apress.gerber.healthylife.DatabaseActivity">
<EditText
android:layout_width="wrap_content"
android:layout_height="wrap_content"
android:inputType="textPersonName"
android:text="Recipe"
android:ems="10"
android:layout_alignParentTop="true"
android:layout_alignParentLeft="true"
android:layout_alignParentStart="true"
android:layout_marginLeft="48dp"
android:layout_marginStart="48dp"
android:layout_marginTop="25dp"
android:id="@+id/recipe"
android:textColorHint="@android:color/holo_blue_light"/>
<Spinner
android:layout_width="wrap_content"
android:layout_height="wrap_content"
android:layout_below="@+id/recipe"
android:layout_marginTop="46dp"
android:id="@+id/spinner"
android:layout_alignLeft="@+id/recipe"
android:layout_alignStart="@+id/recipe"
android:layout_alignRight="@+id/recipe"
android:layout_alignEnd="@+id/recipe"/>
<EditText
android:layout_width="wrap_content"
android:layout_height="wrap_content"
android:inputType="textPersonName"
android:text="Ingredients"
android:ems="10"
android:layout_below="@+id/spinner"
android:layout_alignLeft="@+id/recipe"
android:layout_alignStart="@+id/recipe"
android:layout_marginTop="55dp"
android:id="@+id/ingredients"
android:textColorHint="@android:color/holo_blue_light"/>
<EditText
android:layout_width="wrap_content"
android:layout_height="wrap_content"
android:inputType="textMultiLine"
android:ems="10"
android:layout_below="@+id/ingredients"
android:layout_alignRight="@+id/ingredients"
android:layout_alignEnd="@+id/ingredients"
android:layout_marginTop="54dp"
android:id="@+id/instructions"
android:text="Instructions"
android:textColorHint="@android:color/holo_blue_light"/>
<Button
android:text="Add"
android:layout_width="wrap_content"
android:layout_height="wrap_content"
android:layout_alignParentBottom="true"
android:layout_alignParentLeft="true"
android:layout_alignParentStart="true"
android:layout_marginLeft="30dp"
android:layout_marginStart="30dp"
android:layout_marginBottom="48dp"
android:id="@+id/buttonadd"
android:onClick="onClickAdd" />
<Button
android:text="Delete"
android:layout_width="wrap_content"
android:layout_height="wrap_content"
android:layout_alignBottom="@+id/buttonadd"
android:layout_alignRight="@+id/spinner"
android:layout_alignEnd="@+id/spinner"
android:layout_marginRight="45dp"
android:layout_marginEnd="45dp"
android:id="@+id/buttondel"
android:onClick="onClickDelete (DatabaseActivity)" />
</RelativeLayout>
After creating my Interface, I created a corresponding java class which I will register my listeners for buttons that are used to save data to database. I named the class DatabaseActivity.java. The following is the screenshot of the class
package com.apress.gerber.healthylife;
import java.util.ArrayList;
import java.util.List;
import android.view.View;
import android.support.v7.app.AppCompatActivity;
import android.os.Bundle;
import android.widget.AdapterView;
import android.widget.ArrayAdapter;
import android.widget.Spinner;
import android.widget.Toast;
import android.widget.AdapterView.OnItemSelectedListener;
import android.net.Uri;
import android.content.ContentValues;
import android.content.CursorLoader;
import android.database.Cursor;
import android.widget.EditText;
import android.widget.Toast;
public class DatabaseActivity extends AppCompatActivity implements OnItemSelectedListener{
@Override
protected void onCreate(Bundle savedInstanceState) {
super.onCreate(savedInstanceState);
setContentView(R.layout.activity_database);
Spinner spinner = (Spinner) findViewById(R.id.spinner);
spinner.setOnItemSelectedListener(this);
List<String> categories = new ArrayList<String>();
categories.add("Bread");
categories.add("Fruits");
categories.add("Vegetables");
categories.add("Soup");
ArrayAdapter<String> dataAdapter = new ArrayAdapter<String>(this, android.R.layout.simple_spinner_item, categories);
dataAdapter.setDropDownViewResource(android.R.layout.simple_spinner_dropdown_item);
spinner.setAdapter(dataAdapter);
}
@Override
public void onItemSelected(AdapterView<?> parent, View view, int position, long id){
String item = parent.getItemAtPosition(position).toString();
}
public void onNothingSelected(AdapterView<?> arg0){
//TODO Auto-generated method stub
}
public void onClickAdd(View view){
//Add record to database
ContentValues values = new ContentValues();
values.put(HealthyLifeProvider.RECIPE,
((EditText)findViewById(R.id.recipe)).getText().toString());
values.put(HealthyLifeProvider.INGREDIENTS,
((EditText)findViewById(R.id.ingredients)).getText().toString());
values.put(HealthyLifeProvider.INSTRUCTIONS,
((EditText)findViewById(R.id.instructions)).getText().toString());
Uri uri = getContentResolver().insert(HealthyLifeProvider.CONTENT_URI, values);
Toast.makeText(getBaseContext(), "Data saved in database", Toast.LENGTH_SHORT).show();
}
public void onClickDelete(View view){
//Delete record from database
}
}
In order for us to create our database, we need to create a class that will inherit from ContentProvider class. We will also use the SQLiteOpenHelper class that we had indicated earlier. When we are done programming our class, we need to register our provider in the AndroidManifest.xml file. The following is our provider class which we I have named it HealthyLifeProvider.java
package com.apress.gerber.healthylife;
import java.util.HashMap;
import android.content.ContentProvider;
import android.content.ContentUris;
import android.content.ContentValues;
import android.content.Context;
import android.content.UriMatcher;
import android.database.Cursor;
import android.database.SQLException;
import android.database.sqlite.SQLiteDatabase;
import android.database.sqlite.SQLiteOpenHelper;
import android.database.sqlite.SQLiteQueryBuilder;
import android.net.Uri;
import android.text.TextUtils;
import org.w3c.dom.Text;
public class HealthyLifeProvider extends ContentProvider {
static final String PROVIDER_NAME = "com.apress.gerber.healthylife.HealthyLifeProvider";
static final String URL = "content://" + PROVIDER_NAME + "/healthylife";
static final Uri CONTENT_URI = Uri.parse(URL);
static final String _ID = "_id";
static final String RECIPE = "recipe";
static final String INGREDIENTS = "ingredients";
static final String INSTRUCTIONS = "instructions";
private static HashMap<String, String> HEALTHYLIFE_PROJECTION_MAP;
static final int HEALTHYLIFE = 1;
static final int HEALTHYLIFE_ID = 2;
static final UriMatcher uriMatcher;
static {
uriMatcher = new UriMatcher(UriMatcher.NO_MATCH);
uriMatcher.addURI(PROVIDER_NAME, "healthylife", HEALTHYLIFE);
uriMatcher.addURI(PROVIDER_NAME, "healthylife/#", HEALTHYLIFE_ID);
}
private SQLiteDatabase db;
static final String DATABASE_NAME = "Healthylifedb";
static final String HEALTHYLIFE_TABLE_NAME = "healthylife";
static final int DATABASE_VERSION = 1;
static final String CREATE_DB_TABLE =
"CREATE TABLE " + HEALTHYLIFE_TABLE_NAME +
" (_id INTEGER PRIMARY KEY AUTOINCREMENT, " +
" recipe TEXT NOT NULL, " +
" ingredients TEXT NOT NULL, " +
" instructions TEXT NOT NULL);";
/**
* Helper class
*/
private static class DatabaseHelper extends SQLiteOpenHelper{
DatabaseHelper(Context context){
super(context, DATABASE_NAME, null, DATABASE_VERSION);
}
@Override
public void onCreate(SQLiteDatabase db){
db.execSQL(CREATE_DB_TABLE);
}
@Override
public void onUpgrade(SQLiteDatabase db, int oldVersion, int newVersion){
db.execSQL("DROP TABLE IF EXISTS " + HEALTHYLIFE_TABLE_NAME);
onCreate(db);
}
}
@Override
public boolean onCreate(){
Context context = getContext();
DatabaseHelper dbHelper = new DatabaseHelper(context);
db = dbHelper.getWritableDatabase();
return (db == null) ? false:true;
}
@Override
public Uri insert(Uri uri, ContentValues values){
long rowID = db.insert( HEALTHYLIFE_TABLE_NAME, "", values);
if(rowID > 0){
Uri _uri = ContentUris.withAppendedId(CONTENT_URI, rowID);
getContext().getContentResolver().notifyChange(_uri, null);
return _uri;
}
throw new SQLException("Failed to add record in the db " + uri);
}
@Override
public Cursor query(Uri uri, String[] projection, String selection, String[] selectionArgs, String sortOrder){
SQLiteQueryBuilder qb = new SQLiteQueryBuilder();
qb.setTables(HEALTHYLIFE_TABLE_NAME);
switch (uriMatcher.match(uri)){
case HEALTHYLIFE:
qb.setProjectionMap(HEALTHYLIFE_PROJECTION_MAP);
break;
case HEALTHYLIFE_ID:
qb.appendWhere(_ID + "=" + uri.getPathSegments().get(1));
break;
default:
}
if(sortOrder == null || sortOrder == ""){
sortOrder = RECIPE;
}
Cursor c = qb.query(db, projection, selection, selectionArgs, null, null, sortOrder);
c.setNotificationUri(getContext().getContentResolver(), uri);
return c;
}
@Override
public int delete(Uri uri, String selection, String[] selectionArgs){
int count = 0;
switch(uriMatcher.match(uri)){
case HEALTHYLIFE:
count = db.delete(HEALTHYLIFE_TABLE_NAME, selection, selectionArgs);
break;
case HEALTHYLIFE_ID:
String id = uri.getPathSegments().get(1);
count = db.delete(HEALTHYLIFE_TABLE_NAME, _ID + " = " + id +
(!TextUtils.isEmpty(selection) ? " AND (" + selection + ')' : ""), selectionArgs);
break;
default:
throw new IllegalArgumentException("Unkown URI " + uri);
}
getContext().getContentResolver().notifyChange(uri, null);
return count;
}
@Override
public int update(Uri uri, ContentValues values, String selection, String[] selectionArgs){
int count = 0;
switch (uriMatcher.match(uri)){
case HEALTHYLIFE:
count = db.update(HEALTHYLIFE_TABLE_NAME, values, selection, selectionArgs);
break;
case HEALTHYLIFE_ID:
count = db.update(HEALTHYLIFE_TABLE_NAME, values, _ID + " = " + uri.getPathSegments().get(1) +
(!TextUtils.isEmpty(selection) ? " AND (" + selection + ')' : ""), selectionArgs);
break;
default:
throw new IllegalArgumentException("Unkown URI " + uri);
}
getContext().getContentResolver().notifyChange(uri, null);
return count;
}
@Override
public String getType(Uri uri){
switch (uriMatcher.match(uri)){
case HEALTHYLIFE:
return "vnd.android.cursor.dir/vnd.healthylife.healthylife";
case HEALTHYLIFE_ID:
return "vnd.android.cursor.item/vnd.healthylife.healthylife";
default:
throw new IllegalArgumentException("Unsupported URI: " + uri);
}
}
}
The following is a screenshot of AndroidManifest.xml with our provider registered
<?xml version="1.0" encoding="utf-8"?>
<manifest xmlns:android="http://schemas.android.com/apk/res/android"
package="com.apress.gerber.healthylife">
<application
android:allowBackup="true"
android:icon="@mipmap/ic_launcher"
android:label="@string/app_name"
android:supportsRtl="true"
android:theme="@style/AppTheme">
<activity android:name=".Splashscreen">
<intent-filter>
<action android:name="android.intent.action.MAIN" />
<category android:name="android.intent.category.LAUNCHER" />
</intent-filter>
</activity>
<activity android:name=".MainActivity" />
<activity android:name=".DatabaseActivity"></activity>
<provider
android:authorities="com.apress.gerber.healthylife.HealthyLifeProvider"
android:name=".HealthyLifeProvider"/>
</application>
</manifest>
The following is a screenshot of our application saving data to our database

Multithreading and AsyncTask
According to David G and Dawn G (2015) the AsyncTask lets you perform operations in the background. When they’ve finished running, it then allows you to update views in the main event thread. David G and Dawn G (2015) also add that if the task is repetitive, you can even use it to publish the progress of the task while it’s running.
David G and Dawn G (2015) explain that you create an AsyncTask by extending the AsyncTask class, and implementing its doInBackground() method. David G and Dawn G (2015) explain further that the code in this method runs in a background thread, so it’s the perfect place for you to put database code. David G and Dawn G (2015) explain that the AsyncTask class also has an onPreExecute() method that runs before doInBackground(), and an onPostExecute() method that runs afterward. David G and Dawn G (2015) also share that there’s an onProgressUpdate() method of you need to publish task progress.
The following is an example of an AsyncTask called MyAsyncTask
private class MyAsyncTask extends AsyncTask<Params, Progress, Result>{
protected void onPreExecute(){
//Code to run before executing the task
}
protected Result doInBackground(Params... params){
//Code that you want to run in a background thread
}
protected void onProgressUpdate(Progress... values){
//Code that you want to run to publish the progress of your task
}
protected void onPostExecute(Result result){
//Code that you want to run when the task is complete
}
}
In order for us to be able to use the AsynTask class, we added the following code in our DatabaseActivity class
private class DatabaseActivityTask extends AsyncTask<String, Void, Boolean>{
ContentValues values;
protected void onPreExecute(){
ContentValues values = new ContentValues();
values.put(HealthyLifeProvider.RECIPE,
((EditText)findViewById(R.id.recipe)).getText().toString());
values.put(HealthyLifeProvider.INGREDIENTS,
((EditText)findViewById(R.id.ingredients)).getText().toString());
values.put(HealthyLifeProvider.INSTRUCTIONS,
((EditText)findViewById(R.id.instructions)).getText().toString());
}
protected Boolean doInBackground(String... params){
uri = Uri.parse(params[0]);
try{
uri = getContentResolver().insert(HealthyLifeProvider.CONTENT_URI, values);
Toast.makeText(getBaseContext(), "Data saved in database", Toast.LENGTH_LONG).show();
return true;
}catch(Exception e){
return false;
}
}
protected void onPostExecute(Boolean success){
if(!success){
Toast.makeText(getBaseContext(), "Database Unavailable", Toast.LENGTH_LONG).show();
}
}
}
In order for us to be able to implement our AsynTask, we implement it using the following code in the same DatabaseActivity class and also imported android.os.AsyncTask
new DatabaseActivityTask().execute(HealthyLifeProvider.RECIPE, HealthyLifeProvider.INGREDIENTS, HealthyLifeProvider.INSTRUCTIONS);
Following is the screenshot
References:
Android.com (2018). Meet android studio. Retrieved from https://developer.android.com/studio/intro/
Dawn, G. and David, G. (2015). Head first android development. Retrieved from http://trackmakers.com/trackmakers.com/LIBRARY/MEDIADUMP/EBOOKS/Head%20First%20Android%20Development.pdf
FireArt (2018). [online] Available at: https://fireart.studio/blog/7-best-mobile-ux-design- principles-and-best-practices/ [Accessed 23 Sep. 2018].
H.Vaidya, A. and Naik, S. (2017). Comprehensive Study and Technical Overview of Application Development in iOS, Android and Window Phone 8. International Journal of Computer Applications, 64(19), pp.9-21.
Menzies, A. (2015). Designing the app: Choosing the layout and the color scheme. British Journal of School Nursing, 10(3), pp.145-147.
Tsyrulnyk, S. (2018). MIT APP INVENTOR TO CREATE ANDROID APPLICATIONS LABORATORY COURSE WITHOUT PROGRAMMING. OPEN EDUCATIONAL E- ENVIRONMENT OF MODERN UNIVERSITY, (4), pp.91-95.
Saraswat, J. (2017). Genymotion. Retrieved from https://www.webmobril.com/what-is-genymotion-and-why-it-is-the-best-android-emulator/
Meier, R. (2012). Professional android 4 application development. Retrieved from http://yuliana.lecturer.pens.ac.id/Android/Buku/professional_android_4_application_development.pdf


