looking for support on - E Business Apps Development FINAL project.. please see the attached files ..
CIB 4003 – Login and Authentication
PHP -> Login and Authentication
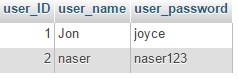
Create a table for storing user information like user name and password as shown below.

Insert some data into this table
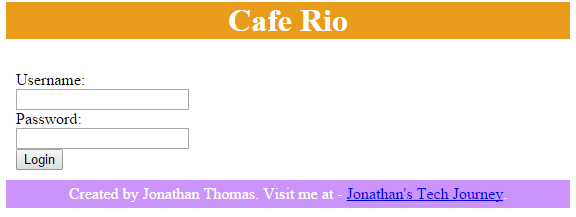
Create an HTML page that has a login in form.
Create a Login Form similar to the one shown below. You are free to use CSS styles to improve the look and feel of the login page.

Make sure that the action of the form is login.php, the action POST and that both fields are named correctly (Uname, Upass) and that they are validated or required.
For more information on how to use HTML forms please refer to the link
http://www.w3schools.com/html/html_forms.asp
When to Use GET?
You can use GET (the default method):
If the form submission is passive (like a search engine query), and without sensitive information.
When you use GET, the form data will be visible in the page address:
action_page.php?firstname=Mickey&lastname=Mouse
|
| GET is best suited to short amounts of data. Size limitations are set in your browser. |
You should use POST:
If the form is updating data, or includes sensitive information (password).
POST offers better security because the submitted data is not visible in the page address.
Next create a php page called login.php that collects the form data, checks it against the database. We will add/modify code to do the following.
Collects the username and password using POST – if none – redirects back
Otherwise checks the DB and If there is a record that matches, the code creates session variables for the user ID and name and then sends it to the first private page – which will be the view things page.
If there is no record or nothing sent from the form, then the user will be sent back (redirected) to the home page. You can also add a pop up message using alert or redirect to an error page instead.
This is the idea for User Authentication:
POST username + password

Launch Page (private)
Welcome Username!!
Login code
authenticate
Login form (public)
Username
Password
The login PHP page will have a SQL command similar to this:
$userQuery = "SELECT * FROM myuser WHERE user_name='" . $_POST['uname'] . "' AND user_password='" . $_POST['upass'] . "'"; //note the use of single and double speech marks
Before this you should check that the values have been sent using code like:
//check if the user has inded entered values into the form
if ((!isset($_POST['uname']))||(!isset($_POST['upass']))) {
echo "You did not provide an username or password";
header('Location: loginform.html');
HInt: Test that the code works at this point before continuing. In the loop just echo the user name. see below for a sample test screen. Note that POST is used not GET

Personalization/Restricting Access: Now we save the Username and ID as Session variables so that we can check that users are logged in and restrict access and personalize. In the first line of the PHP document start a session.
<?php session_start(); //start session ?>
Then - in the loop which cycles through the records to check if the username is there create the Session variables and then redirect them to the Launch Page for the user
while($row = $result->fetch_assoc()){
echo "Welcome ". $row['user_name'];
echo "Your user ID is " . $row["user_ID"];
//create session variables
$_SESSION['user_ID']=$row['user_ID'];
$_SESSION['user_name']=$row['user_name'];
}
header("Location: product.php");
}
To logout, simply create a hyperlink that goes to a php page logout.php page that has this code:

Ok lets get to work:
First create an html file called loginform.html In this file you create the user interface for the user to enter the username and password. Basically what you are creating now is a html Form.

When you preview this file, it looks like this
When the user clicks on the Login button, the action is handled by some php code that we write in a file called login.php
In Dreamweaver create a new (empty) php file and call it as login.php 

This file contains a php code to
Authenticate user
Error handling
Re-direct user.
If the user is a valid user, then we re-direct him to his personal page. Create a new file called welcome.php which looks like this
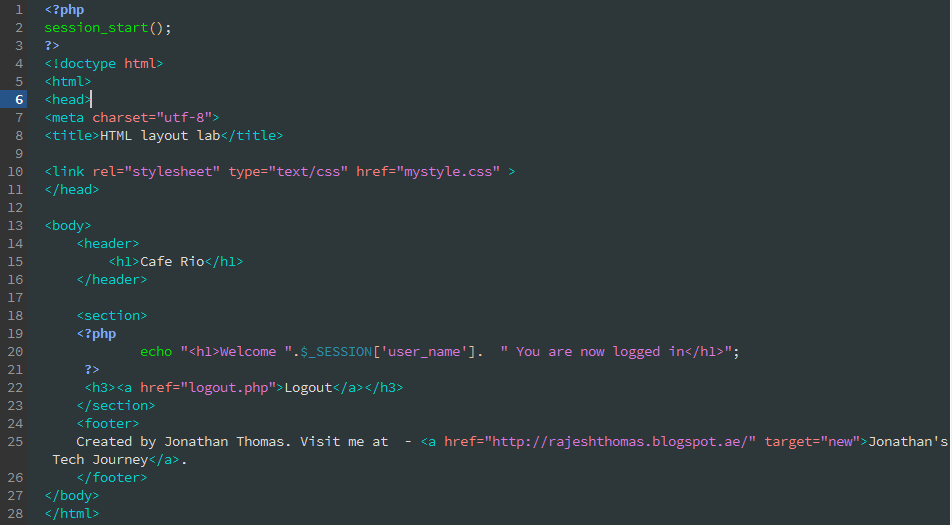
Notice how we have provided a logout link. This will execute the code for logging out in the file logout.php So lets create it like this.

Exercise:
This a simple one. All you got to do is display the products in the user’s welcome page. You already have the code from the last lab activity.
7


