I am having trouble with finding the subnet and the IP address for the different devices.
CCNA: Network Basics SA Exam
CCNA: Network Basics
Skills Assessment – Student Training Exam
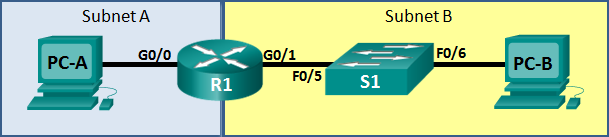
Topology
Assessment Objectives
Part 1: Develop the IPv4 Address Scheme (15 points, 20 minutes)
Part 2: Configure Device IPv4 and Security Settings (30 points, 20 minutes)
Part 3: Test and Verify IPv4 End-to-End Connectivity (8 points, 10 minutes)
Part 7: Use the IOS CLI to Gather Device Information (10 points, 10 minutes)
Scenario
In this Skills Assessment (SA) you will configure the devices in a small network. You must configure a router, switch and PCs to support IPv4 connectivity. You will configure security on the router. You will test and document the network using common CLI commands.
Required Resources
Packet Tracer
Part 1: Develop the IPv4 Addressing Scheme
Given an IP address and mask of __10.10.128.0 /17_____________ (address / mask), design a VLSM IP addressing scheme that satisfies the following requirements. Network address/mask and the number of hosts for Subnets A and B will be provided by your instructor.
Subnet
Number of Hosts
Subnet A
1000
Subnet B
120
The 0th subnet is used. No subnet calculators may be used. All work must be show in Excel.
The router interface will use the FIRST IP address in the subnet,
The switch management VLAN will be assigned the SECOND usable IP address.
The host computer will use the LAST usable address.
Write down the IP address information for each device:
Device
IP address
Subnet Mask
Gateway
PC-A
R1-G0/0
N/A
R1-G0/1
N/A
S1
PC-B
Part 2: Initialize and Reload Devices
Step 1: Initialize and reload router and switch.
Provide the commands that will erase the startup configurations and VLANs from the router and switch and reload the devices.
Task
IOS Command
Erase the startup-config file on the Router.
Reload the Router.
Show routing table
Delete the vlan.dat file on the Switch
Show interface brief
Part 3: Configure Device IPv4 and Security Settings
Step 1: Configure host computers
Configure the host computers according to the IP scheme
Step 2: Configure R1
Configuration tasks for R1 include the following:
Task
Specification
Disable DNS lookup
Encrypt all passwords in the running configuration
Router name
EdgeRTR
Encrypted privileged exec password
ciscoenpw
Console access password
consolepw
Configure SSH for remote Access
Username: SSHAdmin
Encrypted Password: class123
Domain: ct.com
Modulus: 2048
MOTD Banner
Authorized Access Only
Interface G0/0
Set the description: LAN-A
Set the Layer 3 IPv4 address
Activate Interface
Interface G0/1
Set the description: LAN-B
Set the Layer 3 IPv4 address
Activate Interface
Step 3: Configure S1.
Configuration tasks for S1 include the following:
Task
Specification
Switch name
SW_LAN-B
Disable DNS Lookup
Configure DNS Domain Name
ct.com
Configure Management Interface (SVI)
Set the Layer 3 IPv4 address
Encrypt all passwords in the running configuration
Encrypted privileged exec password
ciscoenpw
Console access password
consolepbw
MOTD Banner
Authorized Access Only
Configure Telnet for remote access (all lines)
Password: vtypw
Configure the switch’s default-gateway
Part 4: Test and Verify IPv4 End-to-End Connectivity
Step 1: Verify network connectivity.
Use the ping command to test connectivity between all network devices.
Use the following table to methodically verify connectivity with each network device. Take corrective action to establish connectivity if a test fails:
From
To
IP Address
Ping Results
PC-A
EdgeRTR, G0/0
PC-A
EdgeRTR, G0/1
PC-A
S1 VLAN 1
PC-A
PC-B
PC-B
EdgeRTR, G0/1
PC-B
EdgeRTR, G0/0
PC-B
S1 VLAN 1
PC-A
SSH to EdgeRTR
PC-A
Telnet to S1
In addition to the ping command, what other command is useful in displaying network delay and breaks in the path to the destination? (5 point)
© 2013 Cisco and/or its affiliates. All rights reserved. This document is Cisco Public. Page 6 of 6


