sam cengage excel2013
New Perspectives Excel 2013
Tutorial 7: SAM Project 1a
Spring Software
CUSTOMIZING WORKBOOKS USING MACROS AND DATA VALIDATION
Project Goal
M Project Name
Project Goal
Sophie Campbell works in the Sales Department at Spring Software, a software development company headquartered in Cambridge, Massachusetts. She has created a workbook to track sales of Spring Software’s various product lines, and she wants you to create macros that make the workbook easier to use. Then, she would like you to protect the workbook to prevent unauthorized users from inadvertently making changes.
GETTING STARTED
Download the following file from the SAM website:
NP_Excel2013_T7_P1a_FirstLastName_1.xlsm
This file is has .xlsm extension, indicating it is an Excel Macro-Enabled Workbook.
Open the file you just downloaded and save it with the name:
NP_Excel2013_T7_P1a_FirstLastName_2.xlsm
Hint: If you do not see the .xlsm file extension in the Save file dialog box, do not type it. Excel will add the file extension for you automatically.
With the file NP_Excel2013_T7_P1a_FirstLastName_2.xlsm still open, ensure that your first and last name is displayed in cell B6 of the Documentation sheet. If cell B6 does not display your name, delete the file and download a new copy from the SAM website.
If you see a Message Bar with a security warning at top of the Excel window, click the Enable Content button in the Message Bar to enable the macros contained in the file. (refer to image below)
Figure 1: Security Warning Message Bar
![]()
Microsoft product screenshots used with permission from Microsoft Corporation. Copyright © 2014 Cengage Learning. All Rights Reserved.
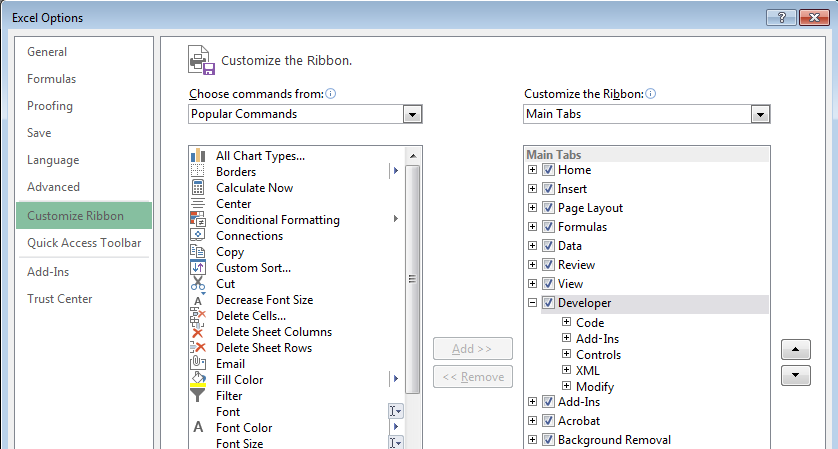
To complete this project you will need to display the Developer tab. To add this tab to the Excel ribbon, click on the File tab to open Backstage view and then click the Options button. In the Excel Options dialog box, click on the Customize Ribbon option and click the Developer check box (see Figure 2). Click the OK button to close the Excel Options dialog box and confirm the Developer tab appears in the Excel Ribbon.
Figure 2: Customize Ribbon section of Excel Options Dialog Box
Copyright © 2014 Cengage Learning. All Rights Reserved.
PROJECT STEPSGo to the Consolidated worksheet and unprotect the worksheet.
Create the defined name for the following ranges:
Use the defined name Groupware_Subscriptions for the range C6:E6.
Use the defined name Groupware_Licenses for the range C7:E7.
Use the defined name Groupware_Other for the range C8:E8.
Delete the defined name Trends assigned to the range G5:G21.
Edit the defined name ConsultingRevenueTotals (which represents the range C20:E20), so that the name is shortened to Consulting.
Apply the defined names SMail_Licenses, SMail_Other, and SMail_Subscriptions to existing formulas in the Consolidated Worksheet. Be certain that the Consulting defined name option is not selected but, otherwise, don’t change any of the default options in the Apply Names dialog box. (Hint: If you receive an error that Excel cannot find any references to replace, make sure that only a single cell – rather than a range - in the worksheet is selected prior to applying the defined names.)
Enter formulas using the SUM function and defined names in the range F16:F18 as described below:
In cell F16, use the SUM function to total values in the defined range MathGenius_Subscriptions.
In cell F17, use the SUM function to total the values in the defined range MathGenius_Licenses.
In cell F18, use the SUM function to total the values in the defined range MathGenius_Other.
Insert the following comment in cell B13: Other sales include individual downloads and box sales. (including the period.) Remove any pre-existing text in the comment. Hide the comment.
Edit the comment in cell B16 by changing 2015 to 2016. The comment should read as follows: Version2 release delayed. Most Version1 subscriptions and licenses expired in 2016; contracts expected to renew in 2017 with Version2 release. Hide the comment.
Create a macro button in cell G3, directly below the View Sparklines button and then complete the following actions:
Assign the macro HideSparklines to the button.
Change the button label to Hide Sparklines.
Run the HideSparklines macro.
Make sure the Use Relative References option is not selected in the Developer tab. Then record a macro named ViewSparklines stored in the current workbook with the description Displays sparkline charts for each row of product revenues and the keyboard shortcut ctrl + t. With the macro recording, complete the following actions:
Select the range G6:G22.
On the ribbon, click the INSERT tab.
In the Sparklines group, click the Line button.
In the Create Sparklines dialog box, enter the range C6:E22 in the Data Range box. (Hint: The Location Range box should already contain the range G6:G22.)
Click the OK button.
Click the Stop Recording button in the Code group on the DEVELOPER tab.
Assign the ViewSparklines macro to the View Sparklines button in cell G2.
Confirm your macro works as expected by switching to the Manchester worksheet and running the ViewSparklines macro you just recorded. (Hint: Use the keyboard shortcut ctrl + t to run your macro.)
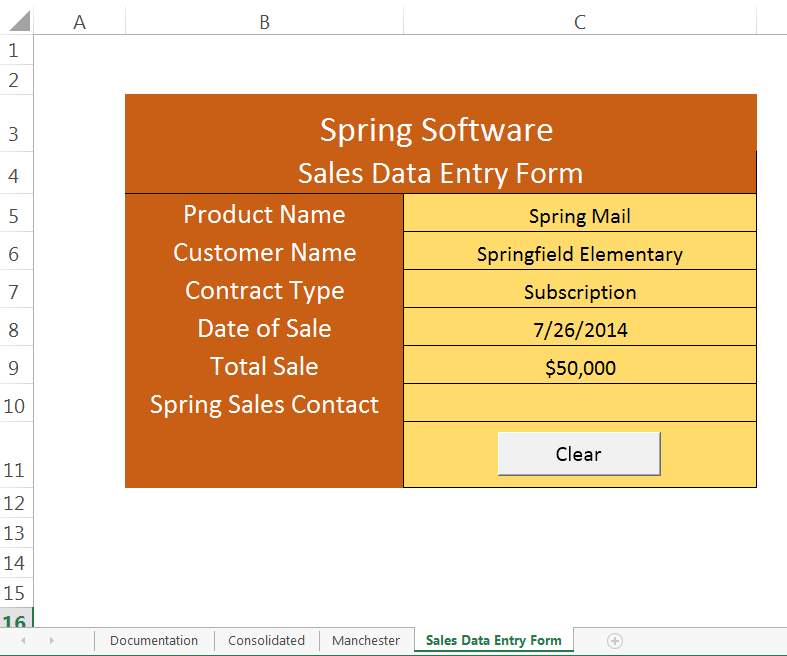
Go to the Sales Data Entry Form worksheet. Unlock the cells in the range C5:C11.
Select the range B5:C10 and create defined names for the range using the Create from Selection option. The names will be located in the left column in this range.
Assign the Clear macro to the Clear macro button in cell C11.
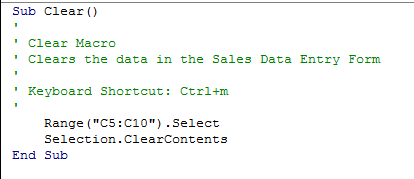
Edit the Clear macro.
In the Clear macro VBA code, change the range used in the code to the range C5:C10. The final line of code should read: Range("C5:C10").Select (see Figure 3 for details)
Run the Clear macro to confirm that the macro erases the value in cell C10.
Copyright © 2014 Cengage Learning. All Rights Reserved.
Create a validation rule for cell C5 that will only allow values from a list. The validation rule should have the following options:
The validation rule should ignore blanks and appear as an in-cell dropdown.
For the data validation source, enter the following list: Spring Groupware, Spring Mail, Spring Math Genius, Spring Consulting.
The input message should have the title Product Name and the Input message Click the arrow to select a product. (including the period.)
The error alert should have the Stop style with the title Invalid Product and the error message An invalid product has been entered. (including the period.)
Create a data validation rule in cell C8 specifying that all inputs must be dates with the following options:
The dates should be greater than or equal to 1/1/2014.
The input message should have the title Date of Sale and the Input message Enter Date of Sale. (including the period.)
The error alert should have the stop style with the title Invalid Date of Sale and the error message Date of Sale must be after 1/1/2014. (including the period.)
Enter the following data for a customer order:
In cell C5, select Spring Mail as the Product Name.
In cell C6, enter Springfield Elementary as the Customer Name.
In cell C7, enter Subscription as the Contract Type.
In cell C8, enter the date 7/26/2012 as the Date of Sale. When the error message appears, click cancel and enter the valid date of sale 7/26/2014
In cell C9, enter the value $50,000 as the Total Sale amount.
Do not enter a value in cell C10.
Protect the Sales Data Entry Form worksheet. Do not use a password.
Protect the structure of the current workbook. Do not use a password.
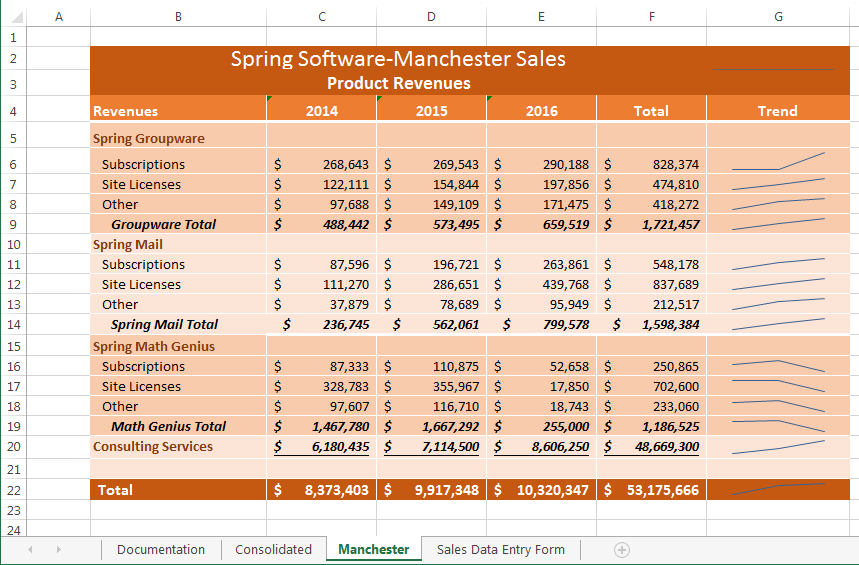
Your workbook should look like the Final Figures on the following pages. Save your changes, remembering to save the workbook as Macro-enabled with the .xlsm file extension. Close the workbook, and exit Excel. Follow the directions on the SAM website to submit your completed project.
Final Figure 1: Consolidated Worksheet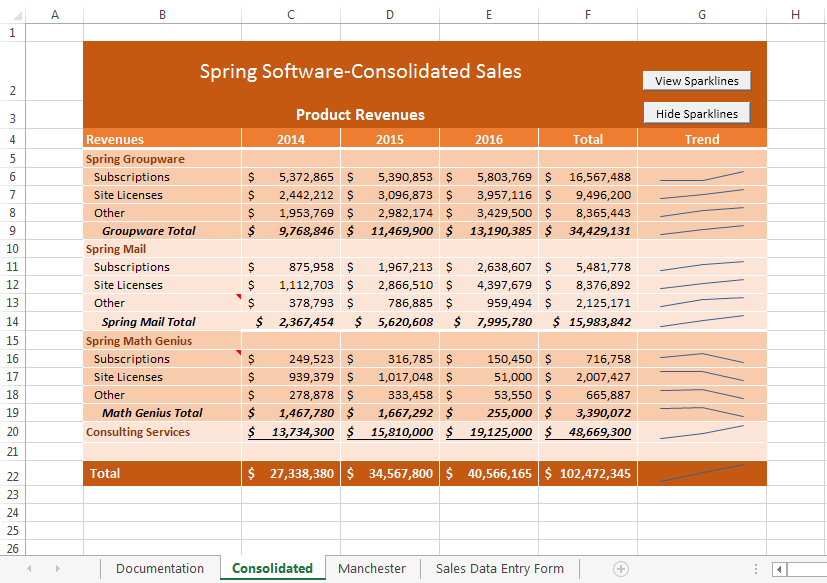
Microsoft product screenshots used with permission from Microsoft Corporation. Copyright © 2014 Cengage Learning. All Rights Reserved.
Copyright © 2014 Cengage Learning. All Rights Reserved.
Final Figure 3: Sales Data Entry Form
Copyright © 2014 Cengage Learning. All Rights Reserved.


