Complete the following task below.
Week 2: System or Application Design Use Case DiagramsUse Case diagrams deal with the functional requirements of a given system. The basic building blocks of an application and the overall objective the design is to achieve. They “are usually referred to as behavior diagrams used to describe a set of actions (use cases) that some system or systems (subject) should or can perform in collaboration with one or more external users of the system (actors)” (Fakhroutdinov , n.d.). With the application HoldMySpot, the Use Case diagrams below shows the objective of reducing the extensive wait times placed on users (with the end result the same as if you took a ticket and waited in line), and the application process the user follows. Also, the users entered information is automatically sent to the employee upon arrival, therefore reducing the amount of time during the initial information gather stage of the standard waiting process.
Use Case Standard Waiting Process VS Application Process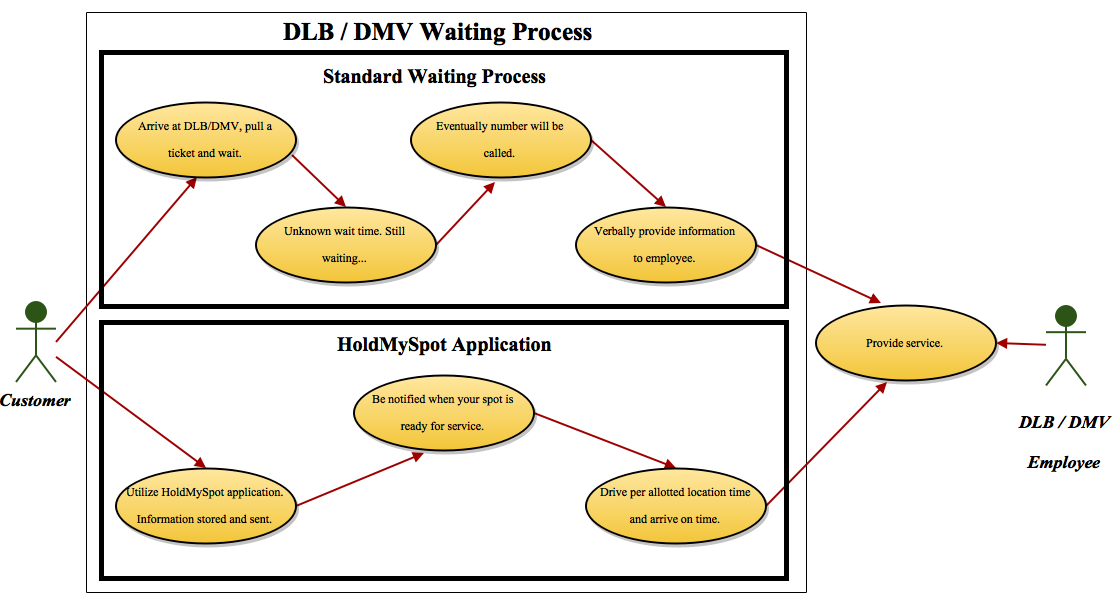

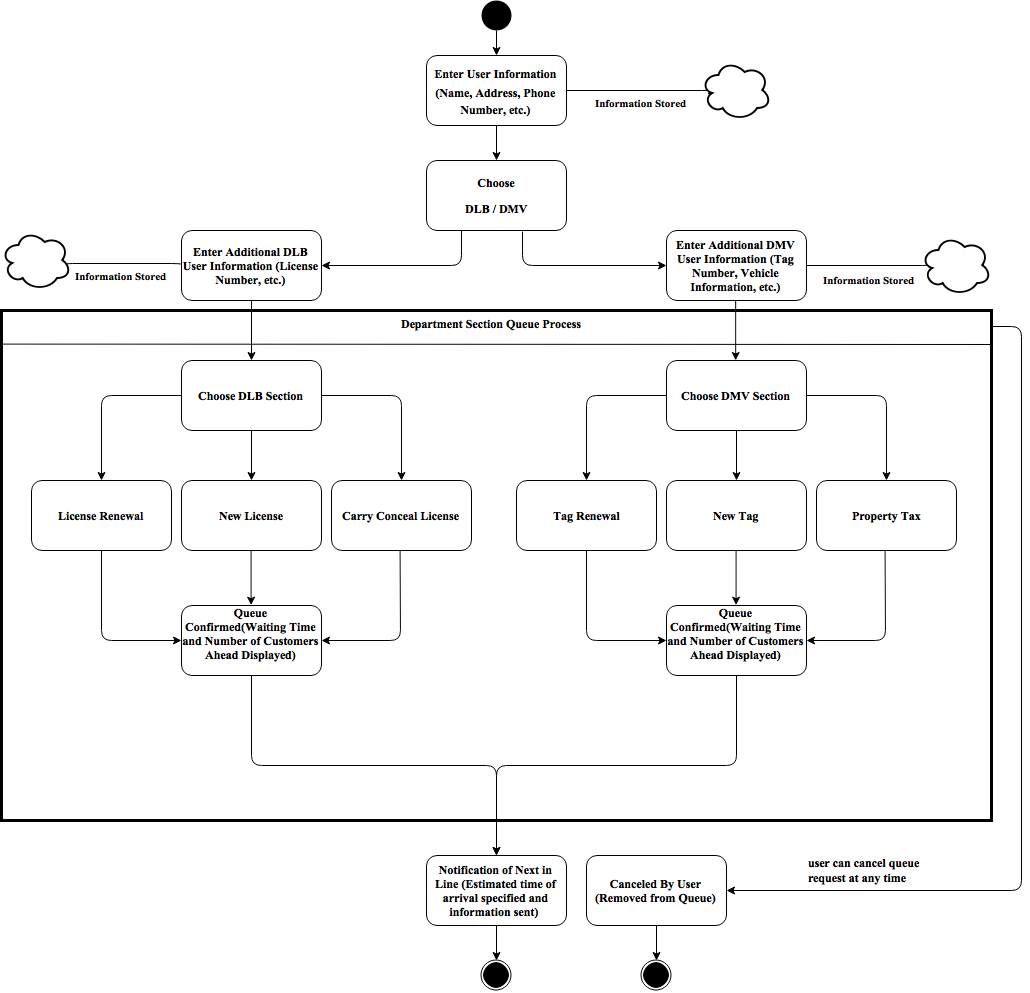
The Functional Decomposition diagram describes the purpose of an application through the illustrated breakdown of its relationships and the overall functionality and interactions between components. Below is a Functional Decomposition diagram of the HoldMySpot application from the beginning step of user input through the final placement in queue. Notice that a user has the ability to cancel the queue placement at any time during the process, and at certain stages information is stored on the users device, and eventually transmitted to the DLB or DMV prior to the users arrival. These steps explain the choices a user has to make and the information required to continue to the next stage in the applications queue process.
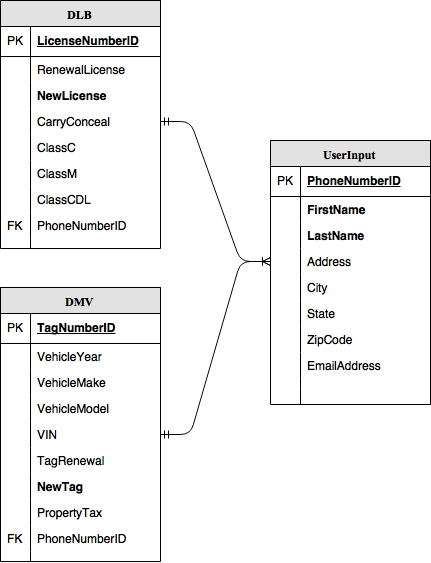
An Entity-Relationship Diagram (ERD) “is a graphical representation of an information system that shows the relationship between people, objects, places, concepts or events within that system” (Rouse, 2014). The ERD represents the data that is necessary for the application to function efficiently. Below is an example of the HoldMySpot application ERD. The UserInput shows what is required by the user in bold, with the Primary Key being the phone number of the user. Once the information is entered, the user is then prompted for the Primary Key of a LicenseNumberID, or TagNumberID, unless the user is queued to acquire a new license or tag, then NewLicense or NewTag is mandatory and autoincrementing with a temporary LicenseNumberID or TagNumberID until one can be officially issued by the DLB or DMV. Additional information may be obtained (i.e. – driver’s license class, make and modle of vehicle, etc.). There are many UserInput to only one LicenseNumberID or TagNumberID. This allows the queue to be accurate to that specific user through the PhoneNumberID and the Primary Key for each selection.
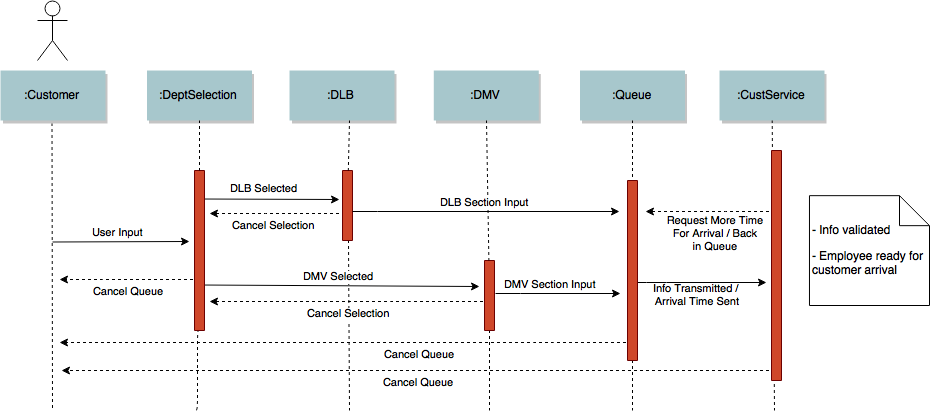
Sequence diagrams show the order in which the application flows. It is “used primarily to show the interactions between objects in the sequential order that those interactions occur” (Bell, 2004). Below is an example of the sequence diagram for the HoldMySpot application and how each stage of the selection choice will ultimately place you in queue and deliver the reason for your arrival to the employee.
The vision of the HoldMySpot application starts with an illustration of what it will look and feel like in the hands of the consumer. Below is a mock-up illustration of the user interface, via a cellular phone device, and the selection process screens the customer will be required to interact with. Through the virtual queue selection process, the customer will ultimately reduce the wait time with the DLB and DMV and encourage the customer to continue with day-to-day operations until called upon by the department.
Welcome ScreenWelcome screen displaying instructions and location for user information input. The user is required to input their first and last name, with the phone number being auto populated from the device itself. This information is automatically stored on the device and eventually sent to the department. Once entered, the user will progress to the next screen.

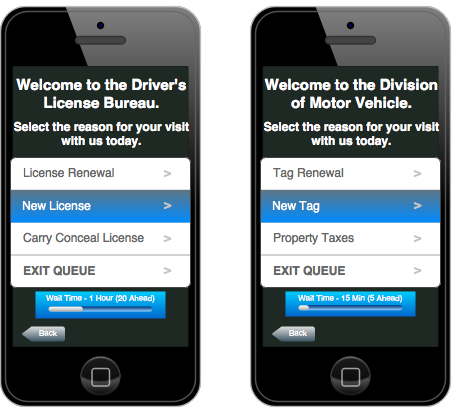
This screen request the user to identify which department the needs to conduct business and displays the estimated wait time, along with the number of individuals already waiting in queue. This information is live and includes customers that are utilizing the stand and wait process, or the pull a ticket and wait approach. Once the user chooses which department they have business with, they will automatically be sent to the next screen. Notice there is the option to cancel the queue request and an option to return to a previous screen to make corrections. At this stage, the user has not been placed into the virtual queue.

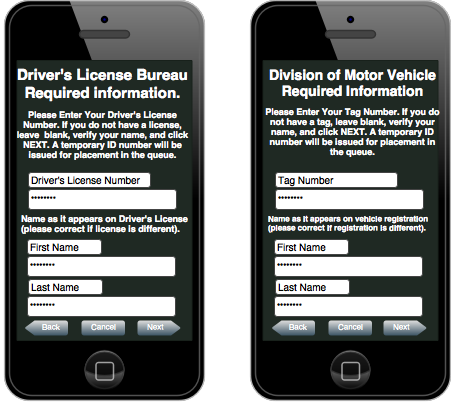
Depending on the user selection, one of the two screens will populate requiring the user to input additional information based on the specific department needs. If the user chooses the DLB, the license number of the user is requested, along with verification of the users first and last name. If the user does not have a license number, they have the option to leave blank and a temporary number will be issued for placement in the queue until an official number can be issued.
If the user selects the DMV, additional information pertaining to the tag or vehicle information will be requested. If the user does not have the tag number, they will be assigned a temporary number for placement in the queue and will need to verify the first and last name before clicking NEXT. Again, once the user is assisted at the department, an official number can be issued, replacing the temporary number.
The next screen will direct the user to choose the reason for their visit. The user will click the option to for placement into that specific queue, and still has the option to return to a previous screen or cancel the queue placement by choosing EXIT QUEUE. Additionally, the estimated wait time is displayed at the bottom of the screen to inform the user, along with the back-button availability to correct mistakes before being finalized in the queue. Once the user chooses this selection, they are placed in the virtual queue.
Queue placement screen advises the successful placement into the queue and also displays the current location of the user, along with the estimated wait time that includes the estimated travel time to the departments location (traffic conditions will vary this time scale). With this screen the user still has the ability to remove themselves from the queue entirely, or allow the application to continually update the overall time based on the remainder in the queue and the travel time based on the user’s location.

Once the user is close to being next in queue, the application will display to the user that they are next in line. Calculated from the current users location and estimated wait time, this should allow the user enough time to arrive to be next in line (based on current traffic conditions and GPS location). The user again has the ability to cancel the placement in the queue or is allowed three five-minute increment extensions to compensate for traffic and other travel factors. When the five-minute increment is selected, it returns the user to the previous queue screen displaying the current location of the user and the estimated wait time including estimated travel time.
Finally, when the user clicks On My Way, the closing screen will appear showing information relating to the arrival of the user. At this stage the users previously entered information is automatically transmitted to the department employee who will begin the process requested by the user. Once the user feels they have completed the queue process, arrives at the department location, the EXIT button will exit the application and close the program.


