Web-based application development
OVERVIEW
In this individual project, you will focus on systems design – designing the user interface. It should be noted that there are a variety of architectural choices that need to be made when deciding on the appropriate design for an information system. In this tutorial, we will focus mainly on one approach, which is the web-based application architecture.
There are two parts of this individual project. Part 1 is related to the overall web application structure – designing the website structure and navigation. Part 2 is related to designing forms and reports for the web-based application. The forms and reports will interface with the MySQL database that was setup and created for individual project 3.
Although you may have been exposed to code generation tools for HTML and website design (e.g., Microsoft Expression Web), this individual project will focus on understanding the HTML language and a server-side scripting language (i.e., PHP) for dynamic web pages. Hence, you will be asked to develop your websites using any general-purpose text editor (e.g., Notepad or Notepad++).
Even though you may complete this project by mindlessly following the instructions (i.e., in zombie mode!), your focus should be on understanding how the theoretical concepts related to systems design discussed in class are actually implemented in a web -based application architecture.
CASE BACKGROUND
The system we will design is a “Student Registration System” which we have been working on during the first 3 projects. Re-familiarize yourself with the case by reading the following description of the system carefully before moving on to the following sections:
As the head of information systems of a local college, you have been assigned the task of developing a new student registration system. The university wants to use a web-based 3-tier system to replace its legacy system that was developed based on mainframe technology. The new system will allow students to register for courses and view report cards online from personal computers connected to the Internet. Professors will be able to access the system to sign up for courses that they wish to teach as well as to record student grades.
The new system will allow students to select multiple course offerings for the coming semester. Course offerings will have a maximum of ten students and a minimum of three students. A course offering with fewer than three students will be canceled. For each semester, there is a period of time during which students can change their schedule. Students must be able to access the system during this time to add/drop courses. Once the registration process is completed for a student, the registration system sends a note to the billing system. If a course is full during the registration process, the student must be notified of the change before submitting the schedule for processing.
At the end of the semester, the student will be able to view an electronic report card. Since student grades are sensitive information, the system must employ extra security measures to prevent unauthorized access.
Professors will be able to access the online registration system to indicate which courses they will be teaching. They can also see which students signed up for their course offerings. In addition, the professors will be able to record and post student grades online. Your task is to conduct the following systems design related activities.
EXERCISES
Your task is to create forms and reports using the skills learned in the lab. For now, we will not worry about authentication and security (i.e., who has access to what). The use case diagram corresponding to the scope of this individual project (IP4) is shown in Figure 1. The dialogue diagram for the “Student Registration System” is shown in Figure 2.
Create the following HTML pages and PHP scripts:
The Homepage. Create a static HTML page that links the Current Enrollment report (exercise #5 below) and the list of students (exercise #6 below). Name this file index.html. See Figure 3 for a brief sketch.
Input Form to Add New Students. Create a PHP script to add a new student to the course registration system. The form should have 2 textboxes for name and studentID and 1 combo box (dropdown) for the new student’s major. Also, you need a submit button to submit the form. In order to reduce data input errors (e.g., typos), the combo box for the student’s major should only display majors that are currently in the database (i.e., all unique values of the Major field in the Student table).1 This form should be named formInputStudent.php. The form should send the form data to a controller script called processInputStudent.php which takes the form data and inserts it to the Student table. For now, the controller script (processInputStudent.php) should merely insert the new record (i.e., a new student) and display a confirmation (success or failure), along with links back to the Student List and the Homepage. The sequence diagram for this use case is shown in Figure 4.
Edit Form to Edit Current Student Information. Create a PHP script to edit student information. The script should take a studentID as input from the URL as a query string and display the student ID, name and major of that student. If the student for that particular studentID (from the query string) does not exist, the script should display an informative error message (e.g., “ERROR: Student with StudentID ([studentID]) does not exist”2). If a student with that studentID exists, then the script should display a form with the student’s information. The studentID should be displayed but should not be editable. The name and majors should be editable. The current name of the student should be displayed in a textbox and the current major should be displayed in a combo box along with other majors that are possible. In other words, the user (i.e., the registrar) will select the major from the combo box to change it. Name this form formEditStudent.php. The form should send the form data to a script called processEditStudent.php which takes the form data and updates the Student table. For now, the controller script (processEditStudent.php) should merely update the record and display a confirmation (success or failure), along with links back to the Student List and the Homepage. The sequence diagram for this use case is shown in Figure 5.
Course Registration Form. Create a registration form that will select a course to add for a student given a particular student ID (from the query string). If the student for that particular studentID does not exist, the script should display an informative error message (e.g., “ERROR: Student with StudentID ([studentID]) does not exist”). If a student with that studentID exists, then the script should show a dropdown combo box with all courses offered for the “Spring 2017” semester. Obviously, the dropdown should not display the courses in which the student is already registered. The dropdown should display CourseID and Section (e.g., “MGMT5002 (01)”). The registrar3 will select a course and upon submitting the form with the submit button, the student should be registered for this course /section. Name the form formCourseRegistration.php and the script that processes the form data processCourseRegistration.php. The controller script (processCourseRegistration.php) should insert the new record (i.e., a new schedule) and display a confirmation (success or failure), along with links back to the Student List and the Homepage. The sequence diagram for this use case is shown in Figure 6.
Current Enrollment. Create a report showing all courses for the “Spring 2017” semester. The report should list departments first and for each department display a bulleted list of course numbers (e.g., MGMT5001) along with section and number of students in parenthesis. Name this report reportCurrentEnrollment.php. Figure 7 shows the sequence diagram for the current enrollment report and Figure 10 provides a brief sketch of what the report should look like. This bulleted list should be hyperlinks and when the “course – section (enrollment)” is clicked, this should open a student list for that particular course. If no students are currently enrolled in a particular course, the enrollment figure should show “0”. Name the student list script reportCourseEnrollment.php. Figure 8 shows the sequence diagram for the course enrollment report and Figure 11 provides a brief sketch of what the report should look like.
List of Students. Display a list of students with the students’ ID, name and major in a table. The table should have 5 columns. The first three will be the students’ ID, name and major. The fourth column should have a hyperlink to the formEditStudent.php described in exercise #3. This hyperlink should have the appropriate query string defined so that upon following this hyperlink the student information edit form should be displayed with the correct student information. The text for the hyperlink should be “Click to edit”. The fifth column should have a hyperlink to the course registration form described in exercise #4. This hyperlink should have the appropriate query string defined so that upon following this hyperlink the course registration form for that student should be displayed. The text for this hyperlink should be “Register for Courses”. Below the table (i.e., list of students), you should have a link to the form for adding new students as defined in exercise #2. The text for this hyperlink should be “Click Here to Add a New Student”. Name this report studentList.php. See Figure 12 for a brief sketch of the student list report.
Submission Checklist
• One HTML file named “index.html” for exercise #1.
• Nine PHP Scripts – formInputStudent.php, processInputStudent.php, formEditStudent.php, processEditStudent.php, formCourseRegistration.php, processCourseRegistration.php, reportCurrentEnrollment.php, reportCourseEnrollment.php and studentList.php.
Submission instructions: • You must have a Word document with the URLS for the pages for each exercise. The URLsshould be numbered (1 to 6), so that it is clear what the link for each exercise is. Please include the query string (for example ?sid=S160) at the end of the URL if needed. So when your TA’s click on the URLs, your pages should open up. Compress this file along with the ten files for exercises into a single archive. Name your zip file, 545_yourid_IP4.zip.
FIGURES

Figure 1 – Use Case Diagram for “Student Registration System”
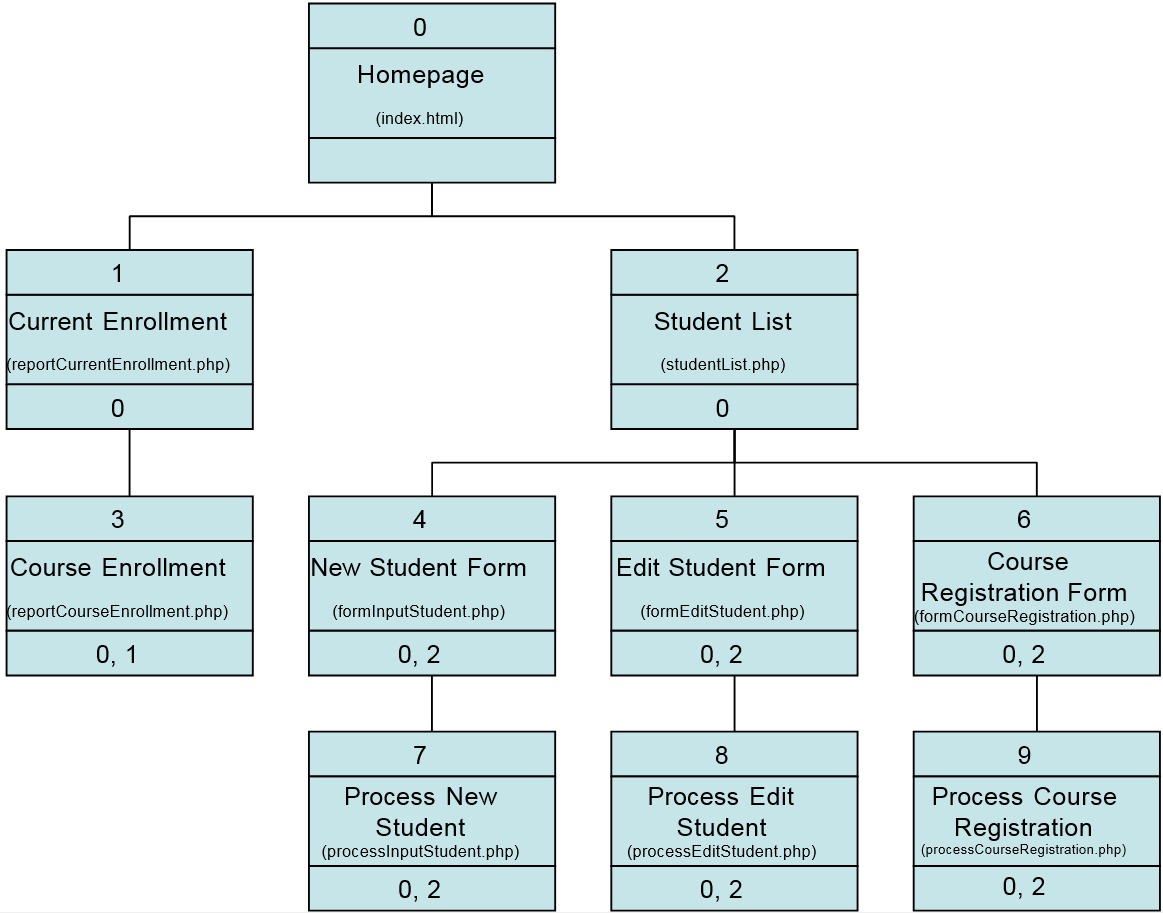
Figure 2 – Dialogue Diagram for “Student Registration System”
![]()
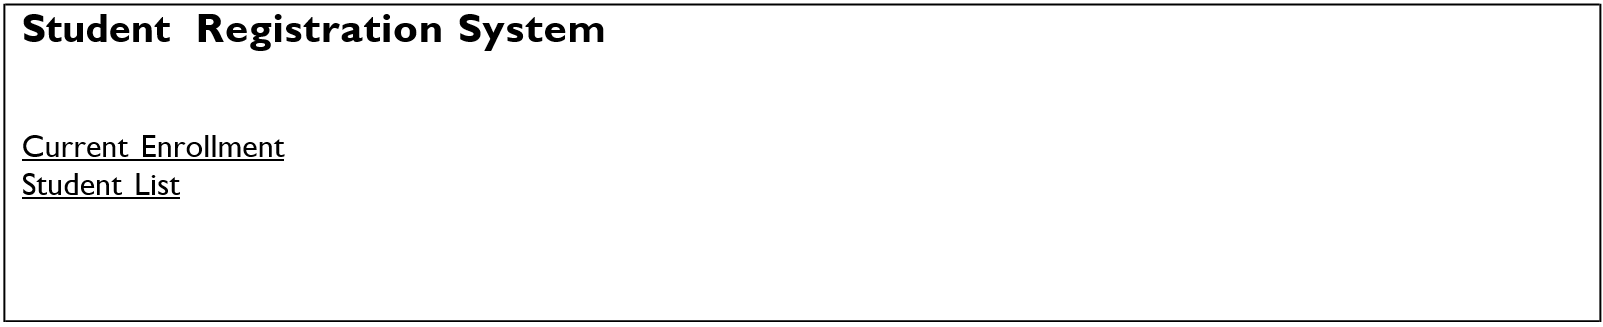
Figure 3 – The Homepage
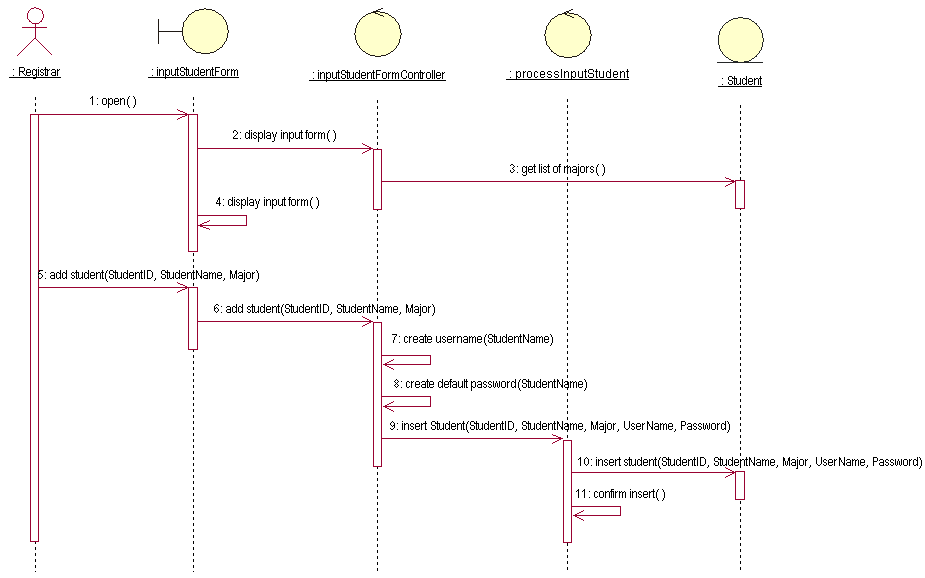
Figure 4 – Sequence Diagram for Use Case “Add New Student”
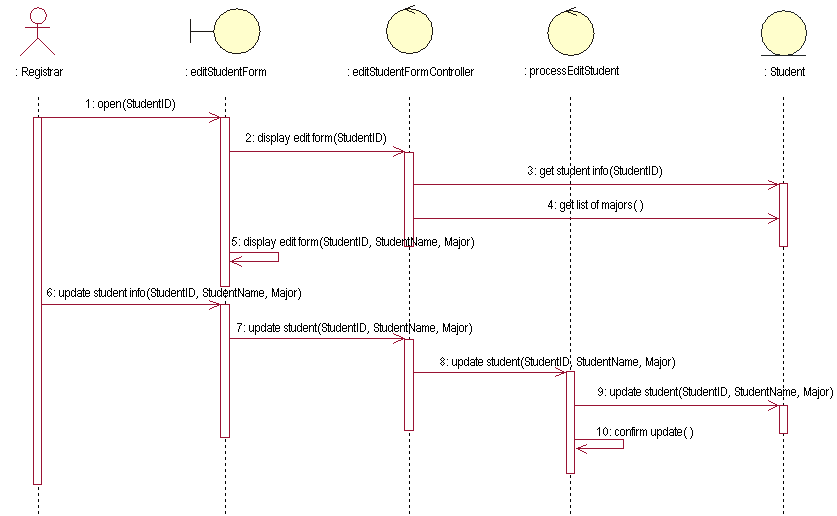
Figure 5 – Sequence Diagram for Use Case “Edit Current Student Info”
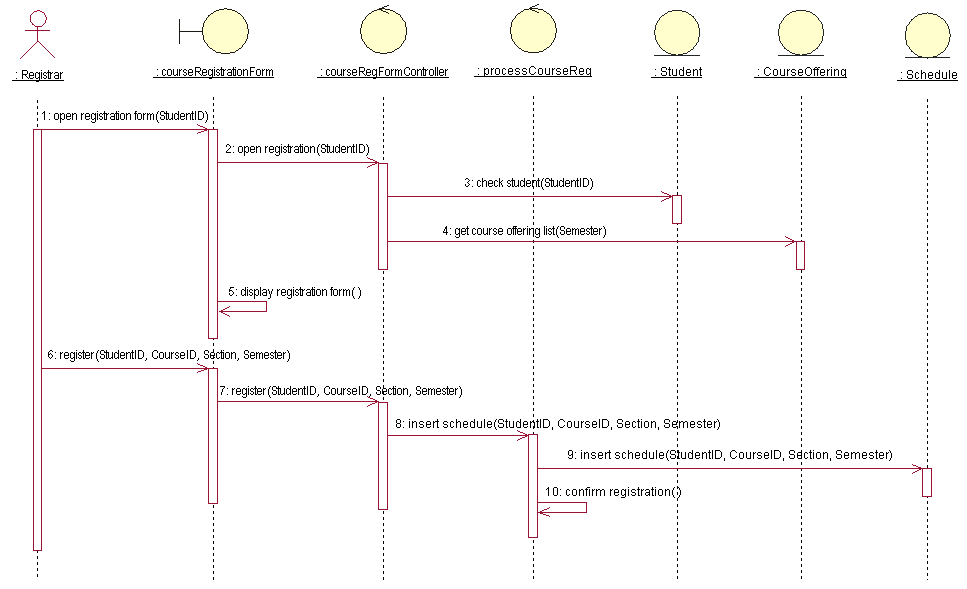
Figure 6 – Sequence Diagram for Use Case “Register Student to Course”
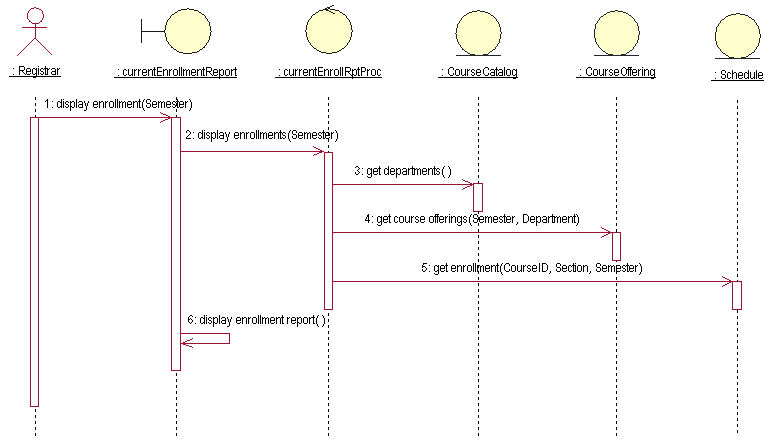
Figure 7 – Sequence Diagram for Use Case “Report Current Enrollment”
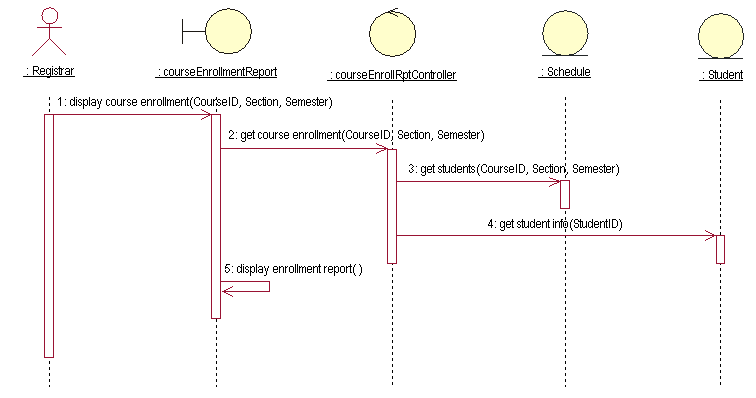
Figure 8 – Sequence Diagram for Use Case “View Course Enrollment”
Figure 9 – Sequence Diagram for Use Case “View Student List”

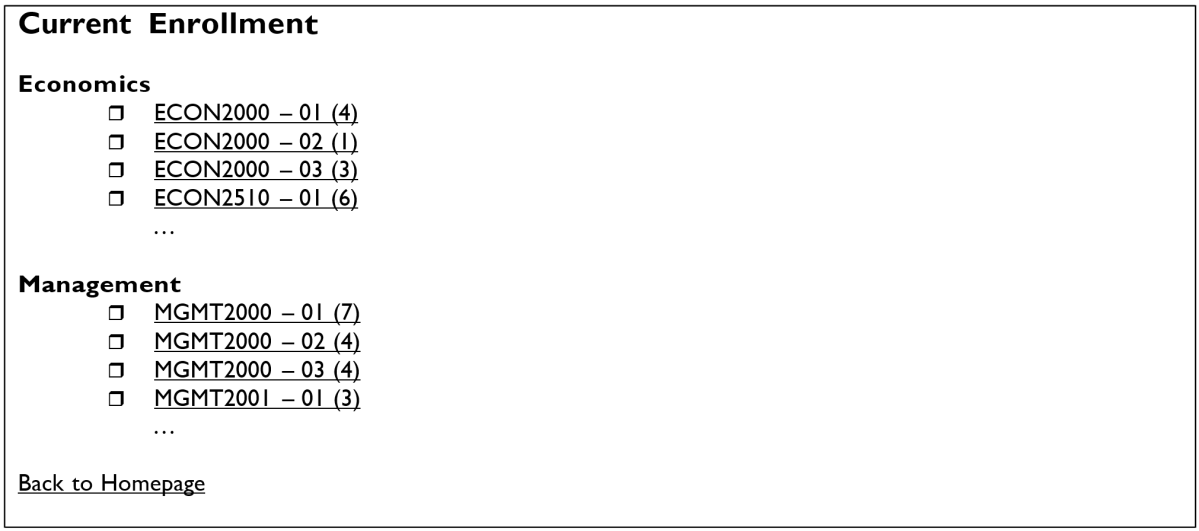
Figure 10 – Current Enrollment Report
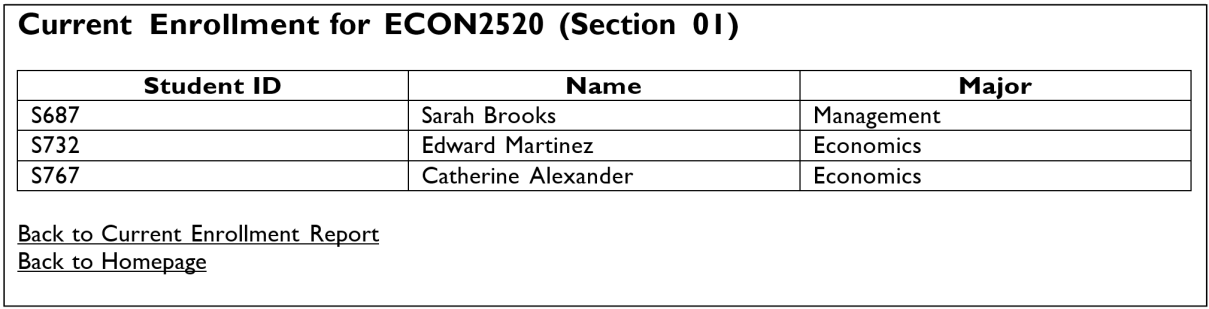
Figure 11 – Course Enrollment Report
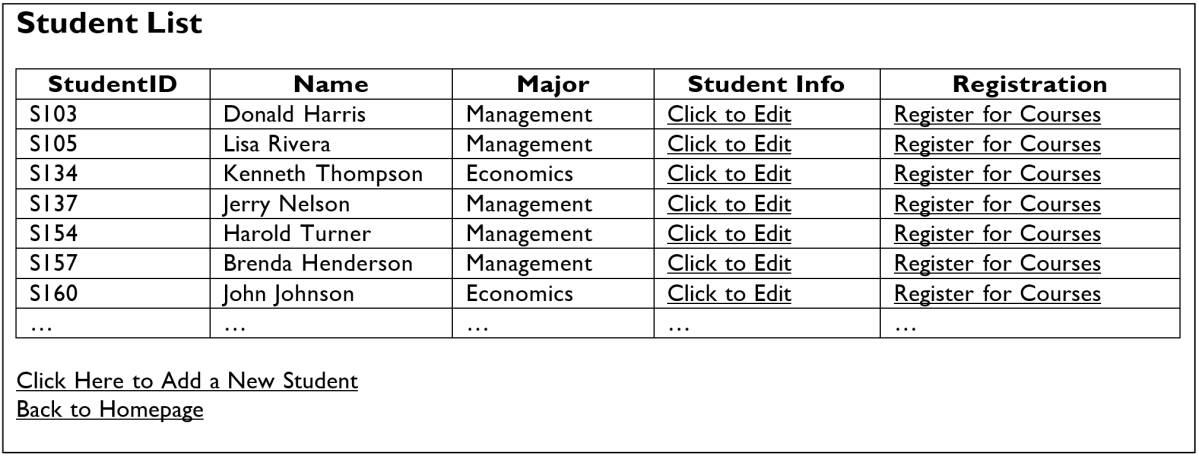
Figure 12 – Student List Report
HINTS
1. The Homepage.
The homepage is just straight HTML. You should not have any problems creating a page with a title (e.g., heading using the H1 tag) and including a bulleted list (unordered list; <ol>) with two items (list items; <li>) that are just hyperlinks to two different pages – reportCurrentEnrollment.php and studentList.php.
2. Input Form to Add New Students.
The lecture notes provide guidance about how to create a form and send that to a processor that executes the INSERT SQL statement to the database for Professors. This will be exactly the same thing for the Student table. You will also need to create a drop-down list to display only the unique Majors from the Student table. This was explained in the lecture notes while discussing how to minimize errors withUIdesign(formEditProfessorWithComboFromDB.php). YoucanapplyasimilarapproachtolistonlytheavailableMajorsfrom the Student table.
3. Edit Form to Edit Current Student Information.
The lecture notes provide an example where you can create a form that is populated with information about a professor so that changes can be made. Basically, this exercise is the same for the Student table. Note that the StudentID information that is required to SELECT fromtheStudenttableneedstobepassedtotheform(formEditStudent.php). YoucandothiswiththeGETvariables($_GET)by passing the student ID in the URL (e.g., formEditStudent.php?sid=S103). A common error students make is to not use the right variable name in the form controller. For instance, if I send the student ID information in the URL with variable name sid (as in formEditStudent.php?sid=S103), then the formEditStudent.php program must retrieve the value assigned to sid
using$_GET[‘sid’]. Ifyouuseaninconsistentvariablename,itwon’twork!
4. Course Registration Form.
For the course registration form you need to create a form with a dropdown list with all course/section pairs -- i.e., if a course has several sections,thentherewouldbemultiplechoicesfortheseseparatecoursesections. Sothedropdownwilllooksomethinglike:
ECON4001 - 01
ECON4002 - 01
ECON4002 - 02 ....
which in HTML should look like:
<select name="coursesection”>
<option value="ECON4001:01">ECON4001 - 01</option>
<option value="ECON4002:01">ECON4002 - 01</option>
<option value="ECON4002:02">ECON4002 - 02</option>
...
</select>
which you can easily generate in PHP by querying the database for all courseID, section for Spring 2017, and while looping through your results you can have something like:
print "<option value=\"" . $course . ":" . $section . "\">" . $course . "-" . $section . " </option>\n";
assuming of course that I name my variables $course and $section for the $myrow['CourseID'] and $myrow['Section'] for the result set. That's fine for creating the form but you'll quickly notice that you'll be sending the composite of "courseID:section" (e.g., "ECON4001:01" as the data in the input (select) field in the GET (or POST, if you want to use the POST method) method to the action controller script processCourseRegistration.php. You'll soon realize that in the controller (processCourseRegistration.php) you'll need to separate the two data parts (course and section) in order to write your INSERT SQL statement to insert data into the Schedule table.
So you need to find a way to parse (dissect) the string to extract the separate parts – course and section. To do so, you may use the explode()function of the PHP language which will allow you to achieve this. The explode() function takes 2 arguments – the 1st argument is the delimiter and the 2nd argument is the string to parse – and returns an array as the return value. Details of this function can be found at http://us.php.net/manual/en/function.explode.php.
So for example, if you are sending the selected courseID/section pair (e.g., ECON4001:01) as a ":" delimited variable named coursesection (as in the code segment shown above), using the GET method, then the controller will get this as:
$coursesection = $_GET['coursesection'];
so you can parse the course and section using something like:
$data = split(":", $coursesection); // parse the string stored in the $coursesection variable
// (e.g., “ECON4001:01”) using the delimiter “:” and let’s store the results in the array named “data”
$course = $data[0]; // first element of the array
$section = $data[1]; // second element of the array
or simply using the list() function (http://us.php.net/manual/en/function.list.php) which assigns variables as if they were an array:
list($course, $section) = explode(":", $coursesection); // this way we don’t need that array // $data to store intermediate / temporary
// results
After this, you will have the CourseID, the Section (and you should also get the StudentID from the form, and you may assume that the semester – Spring 2017 – is a constant), so you can write the INSERT SQL statement to register the student for the course.
5.1. Current Enrollment Report.
You need to write a report of the current enrollment of each of the courses by department, i.e. you need to write a PHP program that will produce HTML code that looks like the following:
<h1>Economics</h1> <ul> <li><a href="reportCourseEnrollment.php?cid=ECON2000&sec=01">ECON2000 - 01 (4)</a></li> <li><a href="reportCourseEnrollment.php?cid=ECON2000&sec=02">ECON2000 - 02 (1)</a></li> <li><a href="reportCourseEnrollment.php?cid=ECON2000&sec=03">ECON2000 - 03 (3)</a></li> <li><a href="reportCourseEnrollment.php?cid=ECON2510&sec=01">ECON2510 - 01 (6)</a></li>
...
</ul>
<h1>Management</h1> <ul> <li><a href="reportCourseEnrollment.php?cid=MGMT2000&sec=01">MGMT2000 - 01 (7)</a></li> <li><a href="reportCourseEnrollment.php?cid=MGMT2000&sec=02">MGMT2000 - 02 (4)</a></li> <li><a href="reportCourseEnrollment.php?cid=MGMT2000&sec=03">MGMT2000 - 03 (4)</a></li> <li><a href="reportCourseEnrollment.php?cid=MGMT2001&sec=01">MGMT2001 - 01 (3)</a></li> ... </ul>
There are many ways you can achieve this, but I found that the easiest way is to create 2 (or more) queries. First you can run a SELECT query to find all departments in the CourseCatalog table (SELECT DISTINCT Department FROM CourseCatalog), which should retrieve Economics and Management for the current data in the database. You can first write the heading for each department (i.e., <h2>$department</h2>). Then while you are looping through each of the departments (from that first query), run another query that selects all course sections from the CourseOffering table for that particular department. This should retrieve only the courses for each of the respective departments when the department query loop is running. And you can then display the list items with the course information (i.e., course ID and section). After all the course offering information (for each department) is displayed as list items, you can then close the list and move on to the next iteration of the department query results. So in essence, think of this as having an outer loop which loops through each department, and within that loop you have an inner loop which retrieves and displays the courses for each department. Obviously, you will also need to join the Schedule table to get the number of registered students for each of the course offerings.4
5.2. Students by Course Section.
From the current enrollment report you will need to link each course to a list of students enrolled for each course section. So when you click on a course/section, you should be linked to the reportCourseEnrollment.php which lists all the students currently enrolled for that section of that particular course.
4 The Current Enrollment report must find the number of students enrolled for each course and section for this semester. The department that offers the course is available in the CourseCatalog table, the course information (courseID, section) is in the CourseOffering table and the current enrollment (i.e., registration) can be derived by counting the number of records in the Schedule table. So you need a 3 table join (CourseCatalog w/ Course offering via CourseID and with Schedule via CourseID, Section, Semester). Notes that since some courses may not have any enrollments
(i.e., matching records in the Schedule table), you should use an OUTER JOIN to join the Schedule table. Another way to get the number of registered students is to write and run a third query which gets the number of students registered to each course from the Schedule table using the courseID, section and semester information, which you should have while within the inner loop.
So this reportCourseEnrollment.php needs 2 pieces of information to be able to list the students for a course / section – we need the CourseID and the Section (and you can assume that the semester information (Spring 2017) is a constant). So you will need to pass these two pieces of information using the GET URL method of the hyperlink, as we discussed in the lecture (e.g., reportCourseEnrollment.php?cid=MGMT2000&sec=01). In this example, I pass the courseID information using a variable named cid and the section information using a variable named sec. The course enrollment form retrieves this information using the $_GET array (i.e., $_GET[‘cid’]).
How do you pass 2 separate GET variables? Well, simply by using the & character to delimit the key=value assignments. So within the course/section loop explained above, you can write something like:
print "<li><a href=\"reportCourseEnrollment.php?CourseID=$courseID&Section=$section\">$courseID - $section ($numEnrollments)</a></li>";
assuming of course that you stored the information from the database as:
$courseID = $myrow['CourseID']; $section = $myrow['Section'];
6. List of Students.
This is similar to the list of Professors which was explained in the lecture notes.
Final Remarks
Here are some commonly occurring errors:
- Typos in variable names. PHP is case sensitive so if you name a variable $courseID, this variable is not the same as $CourseID.
- Inconsistencies between variable names passed in the URL and those retrieved from the target PHP page. For example, if you pass some information in the URL using the GET method (e.g., ?hello=world), then the receiving PHP page can extract the value of the hello variable (or “world”) using the $_GET array (i.e., $_GET[‘hello’] will be equal to “world”). These variable names are case sensitive!
- Not ending a PHP statement with a semi-colon. - Not ending the string. For example, if you have
$hello = “world;
then since the double quote after world has not ended, the PHP interpreter will think that everything that comes after world (including the semi-colon and the following lines) up until the next double quote character is a value assigned to the variable named $hello.
Good luck !


