Week 5 iLab for evagat
A. Lab #: BSBA BIS245A-5A
B. Lab 5A of 7: Database design using Visio, and based on data requirements and business rules focusing on normalizing data to third normal form.
C. Lab Overview—Scenario/Summary:
TCO(s):
2. Given a situation containing entities, business rules, and data requirements, create the conceptual model of the database using a database modeling tool.
Scenario:
You have been asked to create a database model using the MS Visio Database Model Diagram Template. The purpose of this iLab is to provide experience normalizing the database to third normal form based on limited instructions, data requirements, and associated business rules.
Upon completing this iLab, you will be able to
1. create a new Visio file for database design; and
2. using the data requirements and the business rules provided, develop a conceptual model (ERD), including attribute data types and required field lengths.
D. Deliverables
| Section | Deliverable | Points |
| Step 1 | YourName_Lab5A_ERMatrix.docx | |
| Step 3 | YourNameLab5A.vsdx (Visio Diagram) |
E. Lab Steps
Preparation
1. Download the ER matrix starter file document from the Week 5 iLab page, and save the file to your local drive.
2. Using Citrix for MS Visio and/or MS Access
a. If you are using the Citrix remote lab, follow the login instructions located in the iLab area in Course Home.
3. Start MS Visio
a. open Microsoft Office, Visio application, or
b. if you are using Citrix, click on Microsoft Office Applications folder to start Visio.
Lab
Step 1: Identify the entities and relationships.
a. Over the past 4 weeks, you have created ERDs based on information provided. This week, you will complete the ERD being sure to normalize it to
3NF (third normal form). Normalization is the systematic application of rules designed to eliminate redundancy from the database. Data in previous weeks was, to some extent, normalized for you. This week, it is not. An abbreviated list of the data requirements follows.
College Scheduling Data Requirements
Student ID
Student First Name Student Last Name Course Code
Course Name
Course Description Course Credit Hours Course Time
Course Days Instructor ID Instructor First Name Instructor Last Name Room Number
Room Capacity
b. Open the Word file in the Week 5 Lab Materials, Lab5A_ERMatrix.docx c. Save the Word file as YourName_Lab5A_ERMatrix.
d. An ER Matrix helps define both the entities and the relationships between the entities. Using the partially completed ER Matrix below as a guide, complete
the matrix.
Hint: You should end up with four entities.
1. List each entity both across and down.
2. Determine whether a relationship exists between entities and define that relationship with a verb phrase. (NOTE: The entity with the greatest number of related entities is usually the center of the ER diagram.)
3. Identify minimum (Optional or Mandatory) and maximum (only one, or one or more).

| Student Course | |
| Student Course | none Enrolls in; Mandatory One or more |
| Is taken by: none Optional One or more | |
e. Save the completed matrix to submit as part of your iLab.
Step 2: Create the initial ERD based on the matrix.
a. Open a new blank Database Model Diagram in Visio. If you need assistance with this, refer to the Week 1 Lab Instructions. Be sure that all options are set consistent to those used in previous weeks so that you generate your model in Crow’s Foot notation.
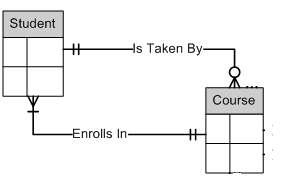
b. One of the issues in denormalized data is that it can result in many-to-many relationships that are not compatible with the relational database. Visio does not allow creation of a many-to-many relationship because of this incompatibility. Therefore, for any many-to-many relationships in your data, you will need to create two one-to-many relationships. See the example below.
c. Based on the information from Step 1, create the initial ERD for the College Scheduling database including the many-to-many relationships. If you need assistance to create the entities, refer to iLabs from Weeks 1 and 2.
d. Assign the primary keys and attributes from the data requirements to the proper entities.
e. Save the file as YourName_Lab5A.vsdx.
Step 3: Normalize the ERD
a. While the initial ERD is accurate, if you design a database without deviating from it, you will encounter problems. For example, a course is offered many times. If you use the course code, for example, BIS245, as the primary key,
you will only be able to list the course once. There are three possible solutions.
1. Assign another primary key, such as an auto-number field, so that the course can be listed multiple times. However, this is not acceptable because it introduces redundancy rather than reducing it.
2. Use a composite primary key consisting of the Course Code and the
Section code. If you create a unique section code (EXAMPLE: YearTerm_Section or 2016SpringA_A), then you can list the course repeatedly. Again, this introduces redundancy, and is not an acceptable solution.
3. Split the table to create two tables. To stay consistent with DeVry terminology, create a second Section table. To ensure that a course is not entered twice, you might modify the Section code to include the course: BIS245_2016SpringA_A. By consistently using this format, you should not be able to duplicate the section, and can avoid a complicated composite key. However, as the Section table will serve as an associative entity, it is acceptable to borrow the primary keys of the parent tables.
b. Open the Visio file from Step 2, and add a new page. Change the page tab to read Revised. Revise the initial ERD based on the following information.
1. A Course may exist without being offered. It exists in the catalog.
Courses are scheduled for a term and given a section. It is the schedule course (Section) that students enroll in, that are scheduled
in rooms and assigned instructors.
2. A Student can exist without being enrolled in a course.
3. An Instructor can exist without being assigned to teach a course.
4. A Room can exist without being scheduled for a course.
c. Save the file with your revised ERD.
Lab 5A Final Deliverables
YourName_Lab5A_ERMatrix.docx (Word Document) from Lab 5A, Step 1.
YourName_Lab5A.vsdx (Visio Diagram) from Lab 5A, Step 3.
Submit these files to the Week 5 iLab Dropbox.
END OF LAB
Copyright © 2015 by DeVry Educational Development Corporation
All rights reserved. No part of this work may be reproduced or used in any form or by any means – graphic, electronic, or mechanical, including photocopying, recording, Web distribution or information storage and retrieval systems – without the prior consent of DeVry Educational Development Corporation.
Page 1 of 5


