You have been asked to create two conceptual database models using MS Visio Database Notation Template. The purpose of this iLab is to have you gain familiarity with the various modeling tools needed to create a conceptual model (entity-relationship diagram) of a database. You will create two conceptual models.
You will then open an existing Access database to explore database objects and to experiment with simple data manipulation using filters and sorts and to begin elementary work with relationships.
D. Deliverables
| Part A: Become Familiar With MS Visio |
| Step 1: Locate the Microsoft Office Applications |
If you are using Cirtix, click on the Microsoft Office Applications folder. If you are using VISIO on a local computer, select it from your Program list. You may need to select Microsoft Office from your Program Menu, and then select Visio.
|
| Step 2: Start Visio |
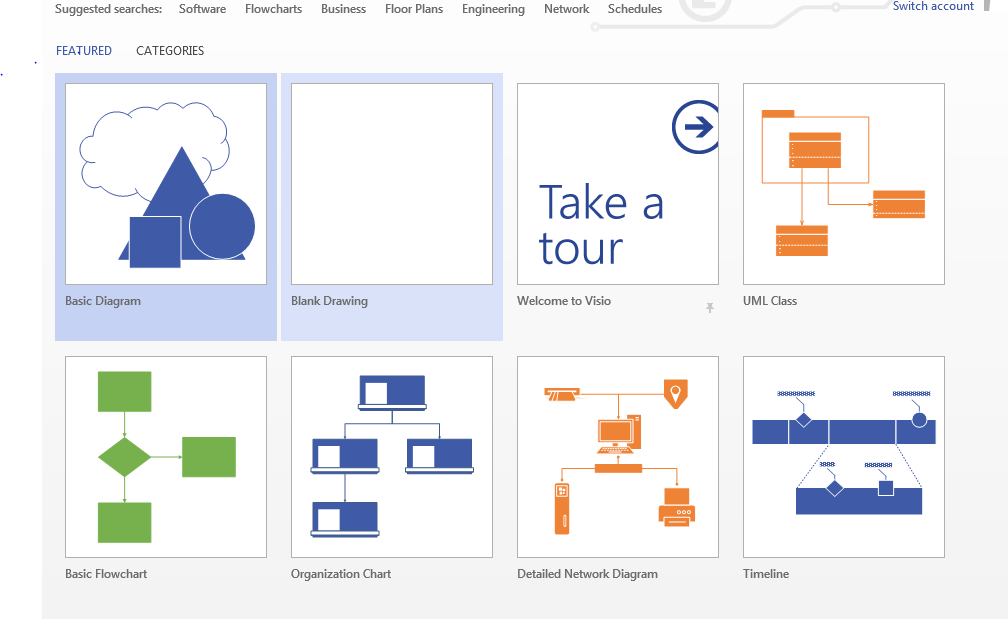
Click on Microsoft VISIO and Microsoft VISIO should open like the following screen. Notice that the list of diagrams is shown. At the upper left-hand side, there are two tab options: Featured and Categories. Click on the Categories section as shown circled in red below.
 ![BIS 245 LAB need done within 2 hours 1]()
|
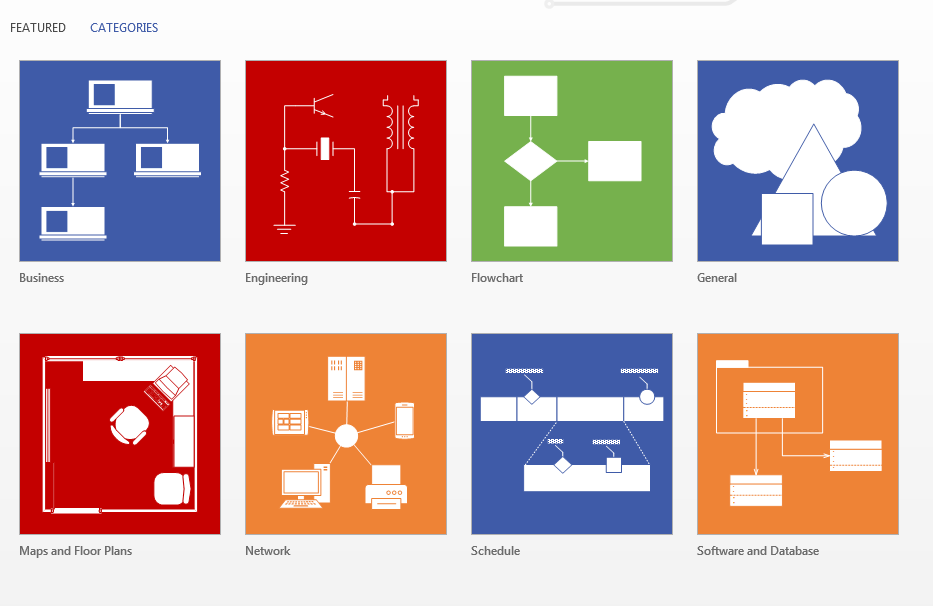
Select the Database and Software Option from the categories listed as seen below.
 ![BIS 245 LAB need done within 2 hours 2]()
|
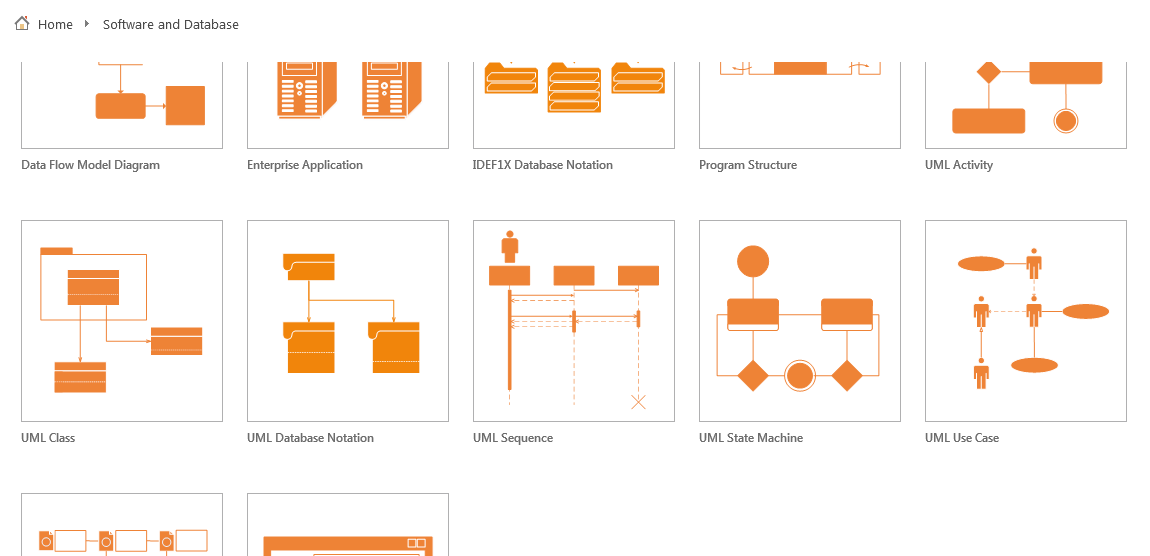
From the template categories, click to select the Software and Database category. See the next screen capture. The Database Notation diagram template is selected.
 ![BIS 245 LAB need done within 2 hours 3]()
|
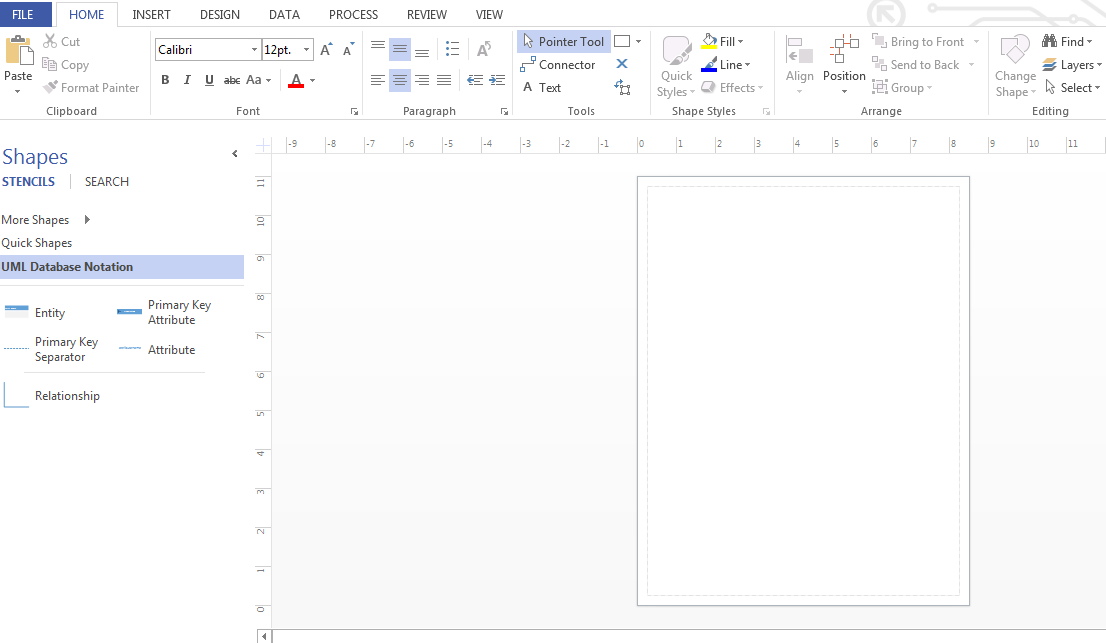
Under Choose a Template, double-click the Database Model Diagram to select the template set, opening the template as follows: (An alternate method is to select the UML Database Notation Model Diagram Template, and then click the Create Button to open the new file.)
![BIS 245 LAB need done within 2 hours 4]()
|
| Step 3 Set Visio Database Options for Crow’s Foot Notation |
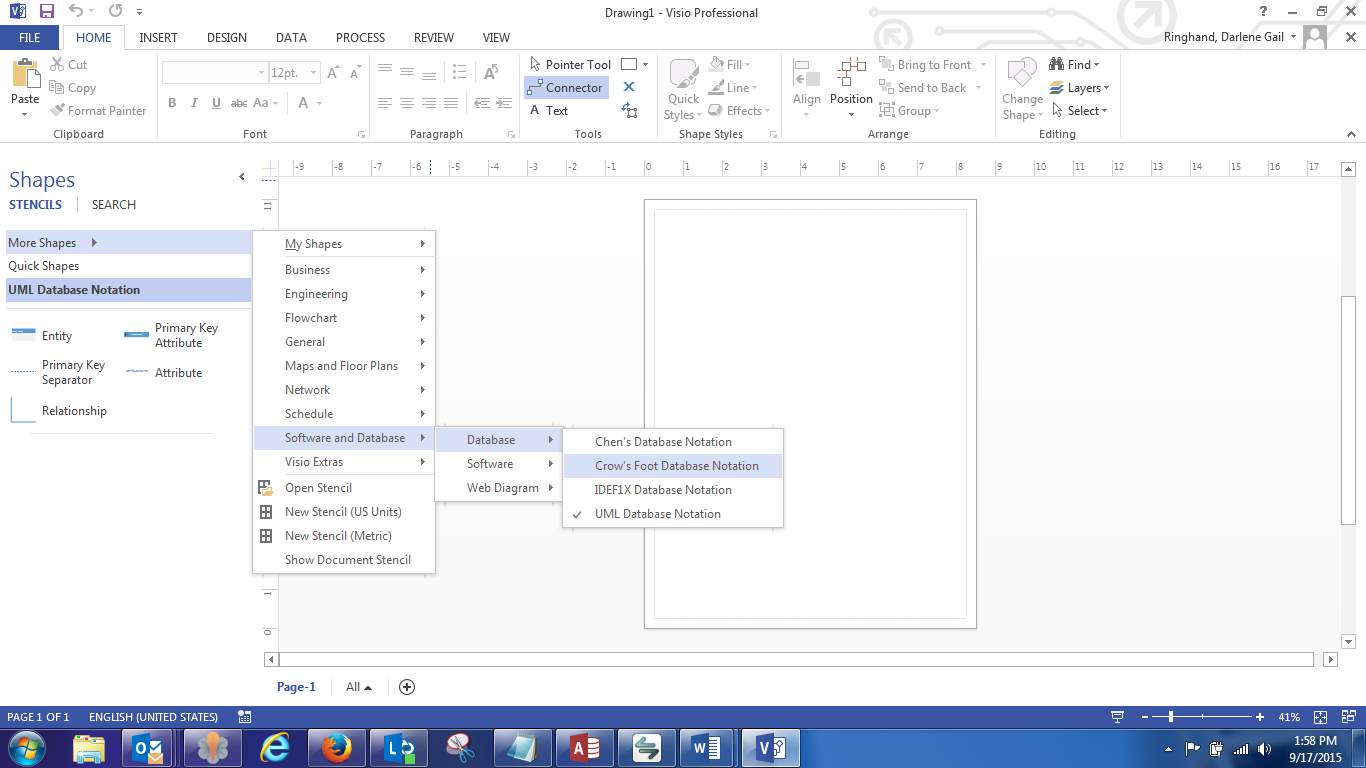
Change VISIO setting to use Crow’s Foot notation for the model diagrams. NOTE: This notation will most closely match the models used in your textbook. From the top menu bar select Connectors. From the menu bar on the left select More Shapes. Select: Software and Database from the first list. From the second list select UML Database Notation. From the last Window, make sure that UML Database Notation is selected as well as Crow’s Foot Notation. Please see the Figure below.
  ![BIS 245 LAB need done within 2 hours 5]()
|
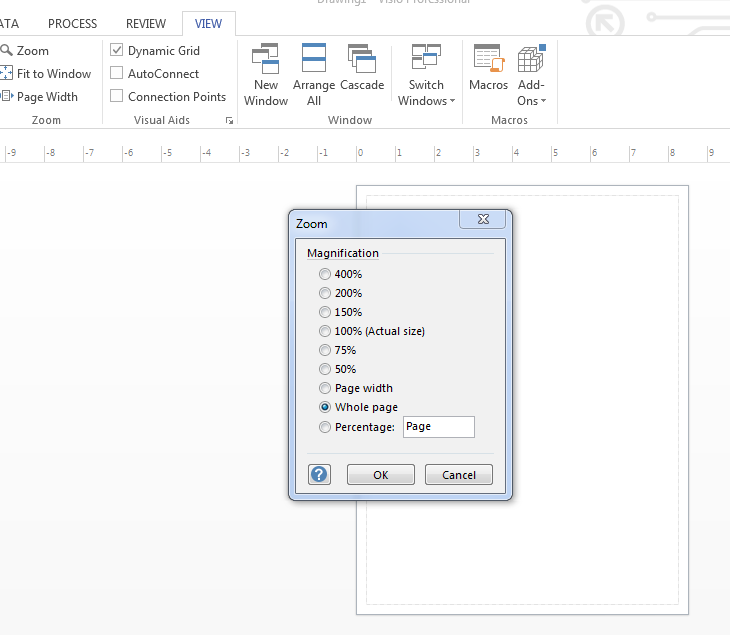
Click to select the VIEW tab to see the VIEW ribbon (toolbar). Select Zoom from the list and select at least 75%. This allows display of more detail in your diagram. See the diagram below.
  ![BIS 245 LAB need done within 2 hours 6]()
|
| Step 4: Conceptual Model for a Two-Table Database |
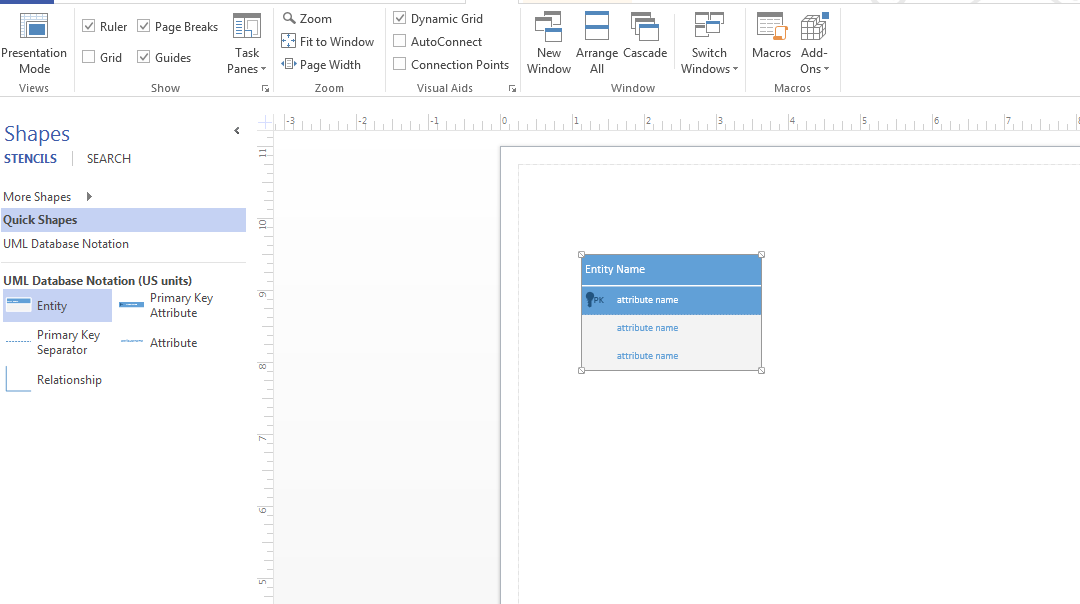
| Now that all settings are correct, it’s time to model a simple database. The database will include two entities. To create the first entity, drag and drop the entity shape from the Shapes toolbox on the left to your open, empty diagram worksheet. Notice (See drawing below) that the entity shape is selected showing the sizing handles. No properties are shown. This version of VISIO uses GUI to create the table.
 ![BIS 245 LAB need done within 2 hours 7]()
|
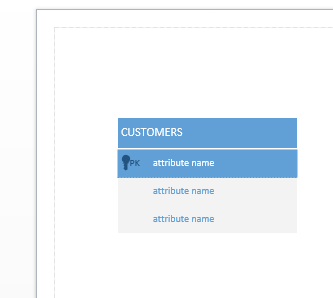
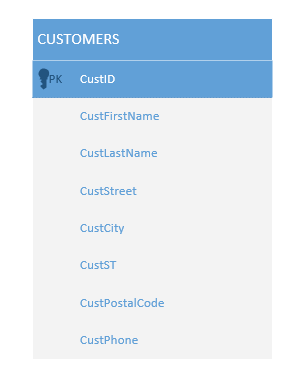
Click on the new Entity. There are 4 parts: The entire entity (green outline) the Entity Name (at the top), The Attribute Name with a “key” which is the Primary Key, and remaining Attribute names. Once you have the Entity Name box selected, double click Entity Name and Enter CUSTOMERS. See Below.
![BIS 245 LAB need done within 2 hours 8]()
|
Double click the key Attribute Name after you have selected the box and enter CustID. Continue entering the following information in attribute name boxes by double clicking each and typing in the name. There are only two listed and you will need seven total. To add additional attribute names, right click the attribute name border until you see: Insert Attribute Before/After in the list of options. Add five additional attribute names and complete this step by adding the following information:
CustFirstName CustLastName CustStreet CustCity CustST CustPostalCode CustPhone. Your VISIO diagram should match the figure below. ![BIS 245 LAB need done within 2 hours 9]()
|
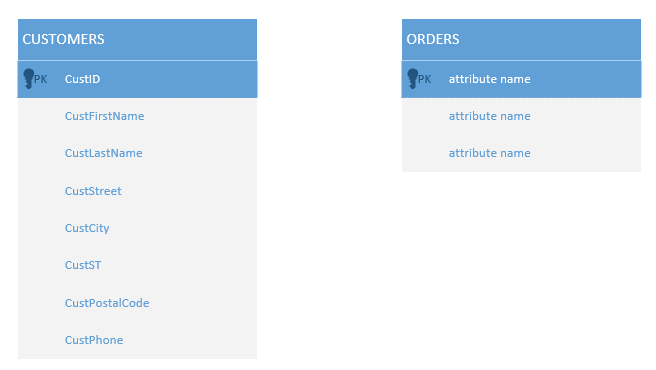
Create the second entity in the same manner beginning with dragging and dropping a second entity shape from the Toolbox on the left. Name the entity ORDERS.
![BIS 245 LAB need done within 2 hours 10]()
|
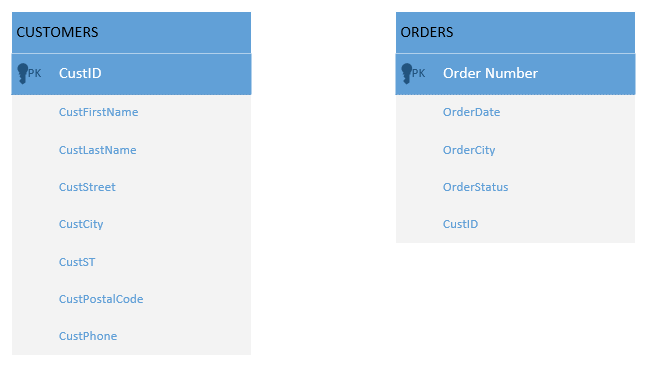
Add the following attributes to the Orders Entity:
OrderNumber (as Primary Key) OrderDate OrderQty OrderStatus Your VISIO ERD should now look like the one shown below. ![BIS 245 LAB need done within 2 hours 11]()
|
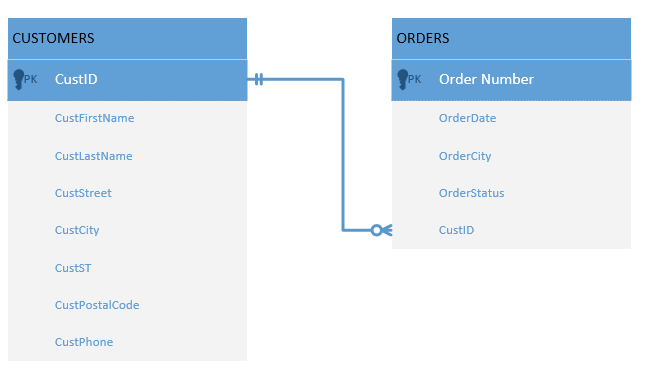
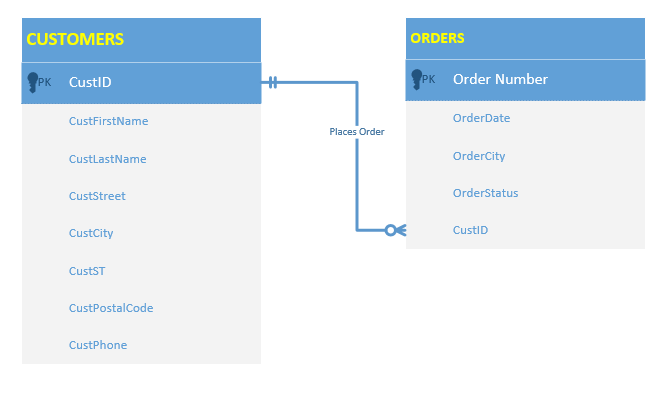
Now define the relationship between the two entities. To do this, drag and drop the relationship shape from the toolbox on the left. To connect the two entities, first add another attribute (CustID) to the ORDERS table. Next, click and drag the connector to the diagram surface. Click and drag the end with 2 lines and drop it on CustID in the CUSTOMERS table. A green circle should appear when the entity is connected. Pick up the other end of the connector (with Crow’s Feet) and drag it to the attribute list and connect it with a green circle to CustID on the ORDERS table. After connecting one end to the Customers Table, if the unconnected end of the connector does not have a "Crows Feet, right click the relationship, select "Set End Symbol" from menu, and choose "1 or more". See below.
![BIS 245 LAB need done within 2 hours 12]()
|
| Step 5: Modify the Database Model |
| The diagram is good, but could use a few improvements. The diagram may be easily modified. First, change the CUSTOMERS entity. Click on the entity to select it. From here you can click the Bold, font color and font size from the Home tab as you would in any other Microsoft program and make changes such as Bold, Black font color, and 14 font size. Select the ORDERS entity and do the same formatting. Select and right click the relationship line. Select edit Text from the options in the dropdown menu. Type in the action that takes place between these two tables. Hint: Orders are placed. Results should look like the results below with font size and colors changed:
![BIS 245 LAB need done within 2 hours 13]()
|
| Step 6: Deliverable for Lab 1 Part A |
| The diagram is not complete. As you move through the course, you will create more sophisticated diagrams. However, the purpose of this iLab is to just build familiarity with the VISIO program and its database options. SAVE your diagram as YourName_Lab1A.vsd. We will use this file for Part B. |
| End of Part A |
| Part B: Create a New Conceptual Model Diagram (ERD) |
| Step 1: Open the Visio Diagram File. |
Open the same VISIO file created in the Part A iLab. Rename the page 1: iLab Part A Go to the Insert Menu, and insert a Blank Page. Double click on the page tab and rename it to iLab1 Part B also.
|
| Step 2: Create a New ERD |
| Use the new page to develop an ERD showing the Following: Entity for Suppliers with the following attributes:
SupplierID (Primary Key) SupplierCompanyName SupplierContactName SupplierContactTitle SupplierAddress SupplierCity SupplierRegion SupplierCountry SupplierPhone SupplierFax SupplierHomePage
Entity for Products with the following attributes.
ProductID (Primary Key) ProductName ProductPrice ProductDescription
The relationship between suppliers and products. In this case the suppliers provide products. |
| Step 3: Modify the Diagram |
| Modify the model by making all attributes of both entities related using a shared Primary Key in the related table. |
| Step 4: Deliverable for Lab 1 Part B |
| Be sure you save your diagram before closing as YourName_Lab1B.vsd. |
| End Part B |
| |
| Part C: Navigating MS Access |
| Preparation |
Download the Lab1_Nwind.accdb file from the Week 1 iLab page and save it to a local drive on your computer. If you are using Citrix for MS Access, you will have to upload the Lab1_Nwind.accdb file to your Citrix drive or allow Citrix access to your system. Follow the instructions for uploading files to Citrix, located in the iLab area under Course Home. Download the Lab1C_Questions.docx file from the Week 1 iLab page. Save the file to your local drive as YourName_Lab1C_Questrions.docx. Open the file so you can provide the answers as you go through the steps in Part C.
|
| Step 1: Locate MS Office Applications |
If you are using Citrix, click on Microsoft Office Applications folder. If you are using Access on a local computer, select Microsoft Office from your Program Menu.
|
| Step 2: Start MS Access |
Click on Microsoft Access, and Microsoft Access should open like the following screen.
![BIS 245 LAB need done within 2 hours 14]()
|
| Step 3: Open Lab1_Nwind.accdb database file. |
Click the Open button on the menu on the left as indicated with the red circle below.
 ![BIS 245 LAB need done within 2 hours 15]()
|
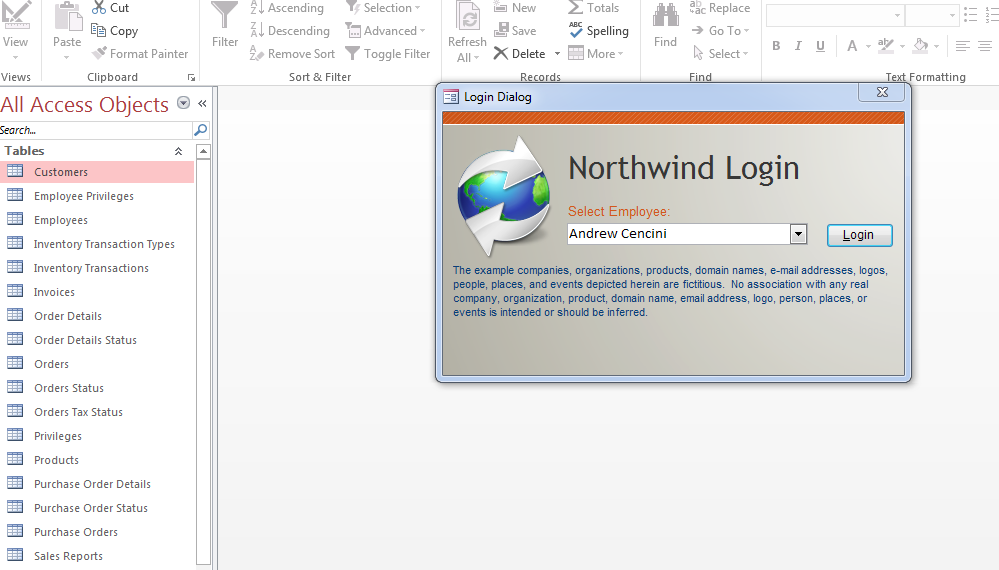
Navigate to locate the Lab1_Nwind.accdb file on your local drive or in Citrix. Click to open the database. You should see the following screen. You will not log in, so click the Close button on the Login form.
 ![BIS 245 LAB need done within 2 hours 16]()
|
| Step 4: View the Tables |
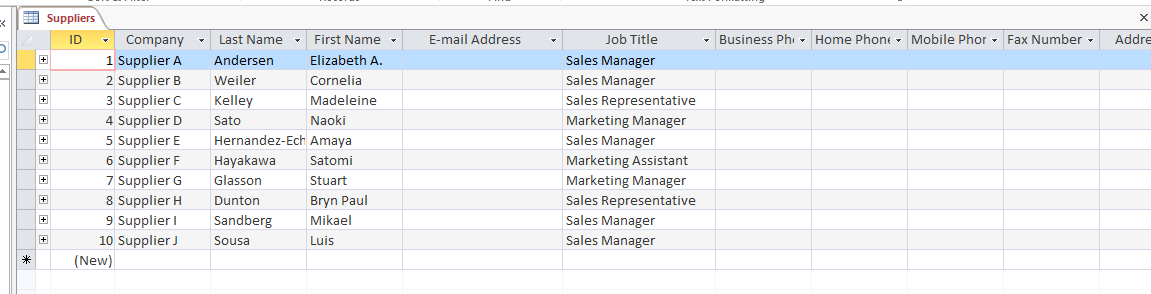
Notice the All Access Objects List on the left side of your screen. Click on Tables to expand the list to show all tables in Northwind Traders Database. From the list of tables, double click on Suppliers to open the suppliers table. See below. Notice that the entire table is not visible. Use the horizontal scroll bar to view the remaining fields in the Suppliers table. Complete your response to Question 1 in the Lab1C_Questions document.
![BIS 245 LAB need done within 2 hours 17]()
|
| Step 5: Examine the Field Names |
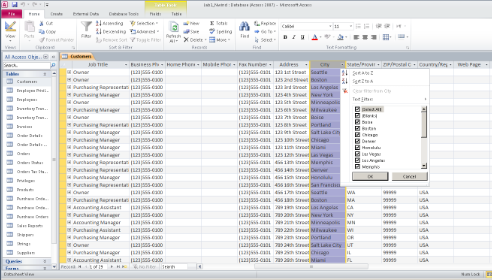
Open the Customer Table and examine the field names. Notice that each has a small down arrow at the right side of the field name at the top of the field. These are used to filter the table based on specified criteria. Scroll over, and click the filter arrow in the City field. Your screen should appear as follows.
![BIS 245 LAB need done within 2 hours 18]()
Simple sort of data. Click the Sort A to Z option at the top of the list of options. Notice that all records in the table are now sorted in alphabetical order by city. Answer Question 2 in the Lab1CQuestions document. Simple filter of data. Click the State/Province down arrow. Click on the Select all option or deselect the list of states. Now scroll down the list and click on TN so that only Customers in Tennessee are selected. Click the OK button to apply the filter. Answer Question 3 in the Lab1C_Questions document. Remove the filter by selecting the Select All option in the State/Province down arrow menu. Close the customer table by clicking the x on the Customer tab. When prompted to save the Customers table select No.
|
| Step 6: Relationships |
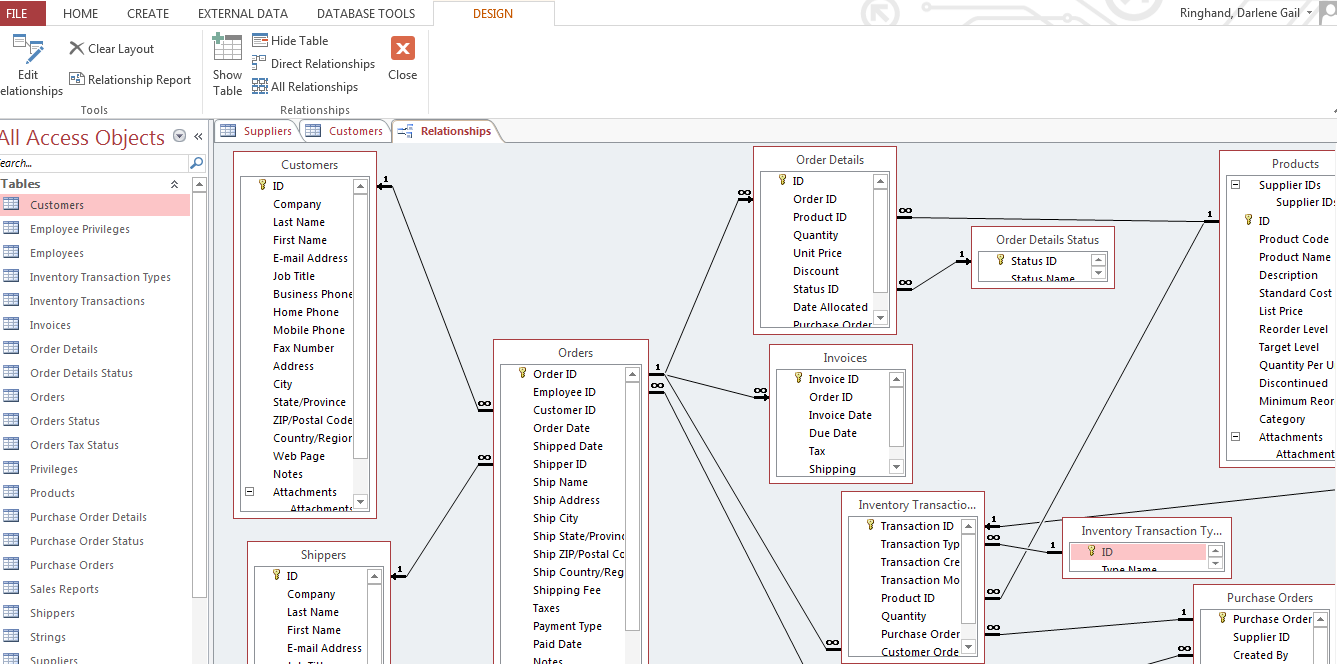
Click to open the database Tools ribbon (Tool bar) and select the Table tab. Click the Relationships button. This allows you to view the database schema made up of the tables with attributes and keys, and relationships between tables. (See below). Scroll bars can be used to view parts of the diagram not on the screen. The key symbol indicates which fields act as primary keys for the tables. Based on the information in the diagram, answer Questions 4 and 5 in the Lab1C _Questions document.
![BIS 245 LAB need done within 2 hours 19]()
|
| Step 7: Queries |
Click the Close button on the Database Tools tab to close the Relationships diagram. Click Queries from the All Access Objects list on the left to display the list of Queries available. Open the Inventory on Hold query. Answer Question 6 of Part 3 in the Lab1C_Questions document. Close Access.
|
| Step 8: Deliverable for Part C |
| Save your Lab1C_Questions document as YourName_Lab1C_Questions. Make sure you have provided your answers. |
| End of Part C |
| |
| Lab 1 Final Deliverables YourName_Lab1.vsd (Visio Diagram) – from Lab 1 Part B YourName_Lab1C_Questons.docx – from the Lab 1 part C. Submit these files to the Week 1 iLab Dropbox.
|
| END OF LAB |