week 11 technical writing
MEMORANDUM
TO: Dr. Melinda Kreth
FROM: DeMarcus Lindsey
DATE: 31 July 2017
SUBJECT: Pre-Writing Analysis
Who are your reader(s)?
The readers of the instructions are individuals interested in purchasing and assembling their own slide-lok cabinet, either at home or in their workplace.
What do you want your reader(s) to be able to do after reading your instructions?
After reading the instructions, the reader should be able to identify all the parts that come with the slide-lok cabinet, be able to attach the relevant parts correctly, faten the cabinet to the wall, and ensure that the assembled parts are tightened properly.
What is the situation that led to the need for these instructions to be written?
Over the past few years, there has been an increase in the number of individuals that want to do things own their own, for example, assemble their own cabinets, instead of purchasing a fully assembled one. One of the main reasons would be because the activity of installing one’s own cabinet not only accords these individuals satisfaction, but also a sense of pride and entitlment to the product every time they look at it. The instructions guide the reader through the process of installing their own slide-lok cabinet without the need for professional help.
How will these instrctions be used?
The instructions on how to install one’s own slide-lok cabinet will be read by the individual first, before following the step-by-step procedure on how to sucessfully install the slide-lok cabinet. The reader will be expected to refer to the instructions after every step to ensure that they not only properly install the cabinet, but also do not damage any parts by placing them in an incorrect position.
What problems could the reader(s) encounter in attempting to use these instructions?
One of the problems that readers could encounter will trying to use these instructiosn would be confusion due to the numerous steps, each with specific details. Another problem would be the presence of numerous parts that come with the slide-lok cabinets.
What type of problems in safety and or quality control do you need to emphasize? What warnings/noted will you need to include?
The problem when it comes to safety and quality control that needs to be emphasized is that the reader should not jump ahead of any step in the instructions. When it comes to warnings/notes that come with the instructions, the reader should slide one side panel at a time, they should let the glue dry after installing the cabinet legs, and they should not overtighten the hanging cabinet doors
What topics do you want to be sure to include/exclude?
Some of the topics that I want to include in the instructions are identifications of all the parts, the process of attaching the relevant parts, fastening cabinet to the wall, hanging the cabinet doors, and finally installing optional adjustment shelf. One of the topics that I may exclude is the process of attaching two or more cabinets.
What format will you use?
The format that will be used to present the instructions to the reader will be paper manual and a online version in the company’s official website for readers that want to read the instructions on their smart phones or tablets.
Given the context in which the instructions/procedures will be read, what formatting strategies do you need to use to enhance accessibility?
I will ensure that the headings are in bold to increase visisbility, and to provide accurate space between the topics and subtopics. I will also ensure that the images are below the corresponding text for easier comprehension. Finally, I will ensure that the text are adequately separated to accord the reader an easier time following them and that the font is simple and can be read easily.
What type of visuals will you need to include?
I will include visuals depicting individuals performing the relevant task that the reader has been instructed. The images will also serve as reference points, so that the reader can easily identify the necessary parts of the slide-lok cabinet in each step. The images will also be appopriately labeled for easier comprehension and location.
What is the basic outline of your instructions?
The outline for the instructions entails steps, located as headings, and bullet points underneath detailing the list of requirement for the reader under the particular step, followed by a warning or note if it is required in each particular step. The instructions will meet the needs of the reader in ensuring that they not only install the cabinet successfully, but also have a strong, durable product at the end of the exercise.
SLIDE-LOK GARAGE & STORE CABINET
READ ALL INSTRUCTIONS BEFORE YOU BEGIN.
DO NOT JUMP AHEAD OF ANY STEP.
If this is your first time assembling a SLIDE-LOK cabinet, you may find it helpful to first assemble the cabinet without gluing to give yourself the opportunity to become familiar with the assembly process of SLIDE- LOK storage cabinets.
Quick and Easy Assembly
All components will slide together without force or effort if the dovetails are lined up properly. If force or exertion is necessary, pieces are not aligned correctly.
Below are the steps for assembling the slide-lok cabinet:
Identify all Pieces.
Remove cabinet parts from box and identify all pieces as pictured in fig. 1.
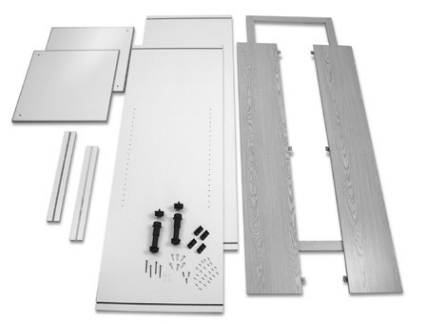
Fig. 1
A. Face Frame
B. Side Panels
C. Shelf Nailers
D. Top and Bottom Shelves.
E. Doors
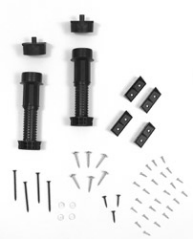
2) Adjustable legs & doweled tops
(4) Clear door bumpers
(4) Corner brackets
(6) 1 1⁄2” Door screws
(4) 2 1⁄2” Black installation screws
(24) 1/2” Silver screws for adjustable Legs, corner
brackets and shelf clips
(3) 1 1⁄4” Black screws for joining cabinets together
Attaching Top and Bottom Shelves
Place face frame “A” face down on a smooth surface to prevent scratching (you may use the box it came in).
Glue all female dovetail joints as shown in fig. 2.


Fig. 2
Slide shelves “D” into position while aligning as in fig. 2A & 2B with holes closest to the face frame.

Fig. 2A

Fig. 2B
Attaching the First Side Panel
Glue rabbet joint as in fig. 3A.


Fig. 3 & Fig. 3A
Dovetail joint and side panel as in fig. 3B.

Fig. 3B
WARNING!
DO NOT SLIDE OTHER SIDE PANEL ON AT THIS TIME
Slide one side panel “B” into place while aligning dovetails on top and bottom of both shelves (see fig. 3C).
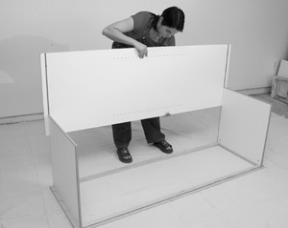
Fig. 3C
Make sure to start all dovetails simultaneously, then slide side panel into rabbet joint as in fig. 3D & 3E.


Fig 3D & 3E
Attaching Top and Bottom Nailers
Glue the female dovetail on the nailer see fig. 4.

Fig. 4
Slide one nailer onto the top shelf (fig. 4A) and one nailer onto the bottom shelf (fig. 4B). Make sure they touch the side panel.

Fig. 4A
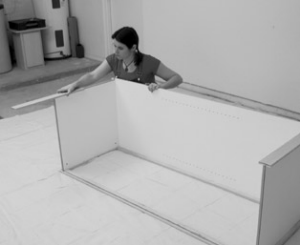
Fig. 4B
Attach Second Side Panel and Installing Corner Blocks
Repeat step 3 for the other side panel. See figures 5 & 5a.
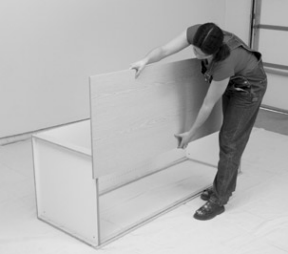
Fig. 5

Fig. 5A
Take the corner blocks and 1/2” screws, and attach to the face frame and side panel of cabinet, see figures 5B, 5C, & 5D.

Fig. 5B

Fig. 5C

Fig. 5D
Attach 2 corner blocks to each side of the cabinet, see figure 5E.

Fig. 5E
Attaching Cabinet Legs
Assemble adjustable leg by attaching the dowel head to the leg (fig. 6, 6A, and 6B).


Fig. 6, 6A & 6B
Take the assembled leg and insert dowel into the hole provided as in fig. 6A.
Fig. 6A
Use 1/2” screws and screw leg into bottom of cabinet to keep it firmly in place (fig. 6C and 6D). Let glue dry

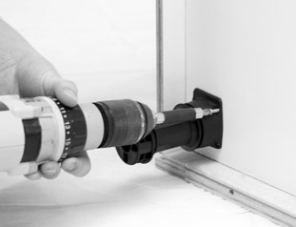
Fig. 6C & 6D
WARNING!
BEFORE PROCEEDING TO THE NEXT STEP LET THE GLUE DRY COMPLETELY.
Fasten Cabinet to Wall
After glue is dry locate studs in wall (fig. 7A).

Fig. 7
Attach cabinet to wall using 2 1⁄2” screws. (See fig. 7)

Fig. 7A
NOTE:
It is important that the cabinet is set flush to the wall and fastened to wall studs for stability and strength.
Hang Cabinet Doors
To hang doors, use the 1 1⁄2” silver screws. Hold door up so the door hinge hole lines up with the pre-drilled hole in the face frame.
Screw in the hinge so the doors are level across the top and flush in the front.
Take clear bumpers and attach as in fig. 8B, to top and bottom of doors.


Fig. 8 & 8B
WARNING!
DO NOT OVER TIGHTEN! It is recommended that you finish tightening with a screwdriver to avoid stripping the pre-drilled holes.
NOTE:
Hinge is 6 way adjustable (up, down, in out, back and forth) fig. 8A.

Fig. 8A
Installing Optional Adjustable Shelf
(If you purchase a shelf package continue with step 9, otherwise skip this step)
To install shelf, use all 4 shelf clips. Push shelf clip into holes, as in fig. 9, on side panel.
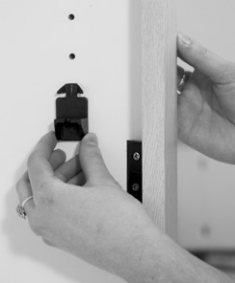
Fig. 9
Make sure the clips are level in front, back and on the other side panel, see fig. 9A
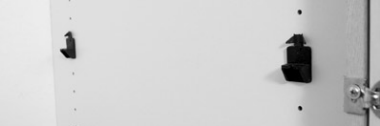
Fig. 9A
Note:
To secure shelf clips to side, use 1/2” silver screws, and screw shelf clips into side panel
Angle shelf and slide into cabinet, setting one side of shelf on top of shelf clip, see fig. 9B.

Fig. 9B
Let shelf drop onto the other side and snap into place, see fig. 9C.

Fig. 9C
To secure screw into underside of shelf as in Fig. 9D.

Fig. 9D
Congratulations!
You have just finished assembling and installing a SLIDE-LOK cabinet.
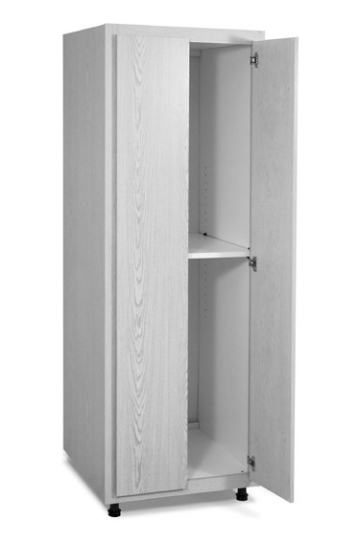
Figure of Final Product.


