Waiting for answer This question has not been answered yet. You can hire a professional tutor to get the answer.
Assignment #3 – Pages EX 60-61 Case Problem 2 – Complete steps 1 – 19 in the textbook then complete the steps below in the same workbook.Insert a new sheet.Name the new sheet with your first and
Assignment #3 – Pages EX 60-61 Case Problem 2 – Complete steps 1 – 19 in the textbook then complete the steps below in the same workbook.
Insert a new sheet.
Name the new sheet with your first and last name.
Hide the sheet.
Save the file with your name and Balance Sheet (e.g. SmithJ Balance Sheet).
Submit this file using the provided link on the assignments page.
Part II: Certification Skills
Case Problem 2
Data File needed for this Case Problem: Balance.xlsx
Scott Kahne Tool & Die Cheryl Hippe is a nancial of cer at Scott Kahne Tool & Die, a manufacturing company located in Mankato, Minnesota. Every month the company publishes a balance sheet, a report that details the company’s assets and liabilities. Cheryl asked you to create the workbook with the text and formulas for this report. Complete the following:
- Open the Balance workbook located in the Excel1 > Case2 folder included with your Data Files. Save the workbook as Balance Sheet in the location speci ed by your instructor.
- In the Documentation sheet, enter your name in cell B3 and the date in cell B4.
- Go to the Balance Sheet worksheet. Set the font size of the title in cell A1 to 28 points.
- In cell A2, enter the text Statement for March 2017.
- Set the width of columns A and E to 30 characters. Set the width of columns B, C, F, and G to 12 characters. Set the width of column D to 4 characters. (Hint: Hold down the Ctrl key as you click the column headings to select both adjacent and nonadjacent columns.)
- Set the font size of the text in cells A4, C4, E4, and G4 to 18 points.
- Set the font size of the text in cells A5, E5, A11, E11, A14, E15, A19, E20, and A24 to 14 points.
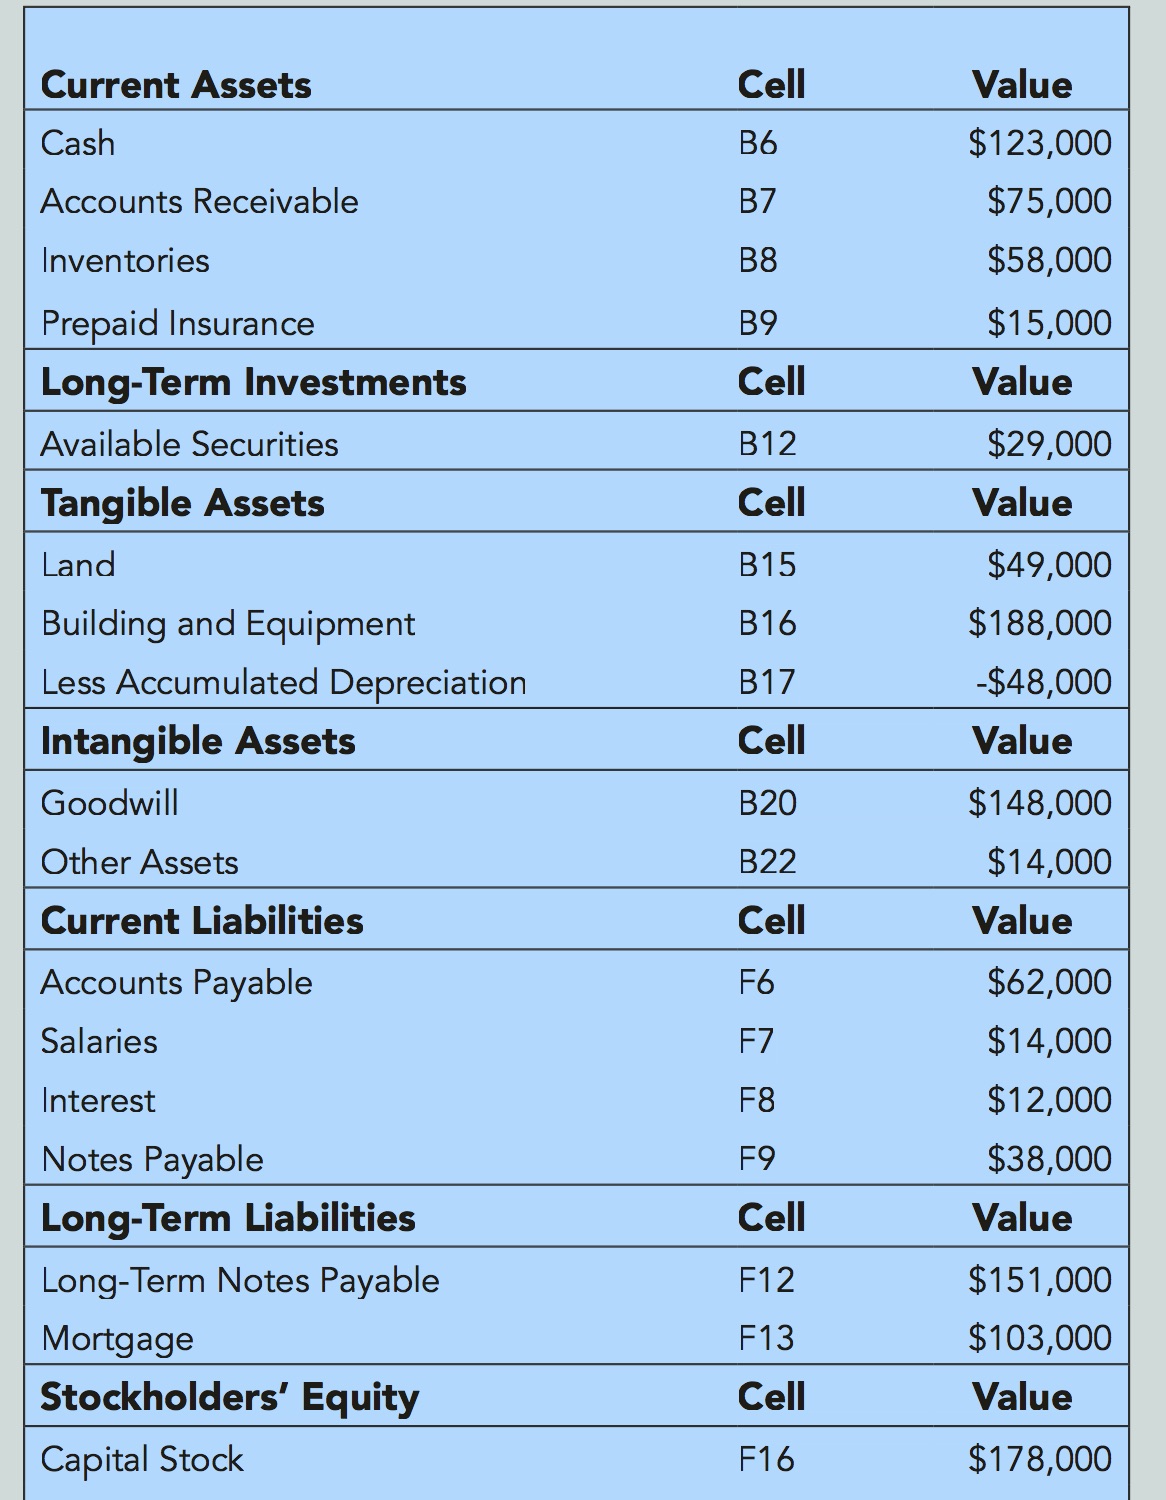
- Enter the values shown in Figure 1-45 in the speci ed cells. (see attachments)
Assignment #4 – Read the information in the Additional Instructions & Corrections document for Week 1 to learn how to customize the Quick Access Toolbar (QAT). After you have learned how to edit the QAT, complete the exercise below.
Note: You may need to do this exercise on a PC as the Mac version of Excel may not have these abilities.
Move the QAT below the ribbon.
Add the following commands (buttons) to the QAT: New, Open, Print Preview and Print, Close All.
Add the AutoSum split button, (that is with the pop up menu arrowhead so you can access more functions).
Put the commands in the same order as the screen shot above.
Take a screen shot of the entire screen including the toolbar and ribbon by pressing the Print Screen key on the keyboard.
Paste the screen shot into a new Word document. (To insert it into a Word document: Open a new Word document, then Paste.)
Save the Word document with your name and QAT (e.g. SmithJ QAT).
Submit this file using the provided link on the assignments page by the deadline.
